树莓派Raspberry Pi 4
一、简介
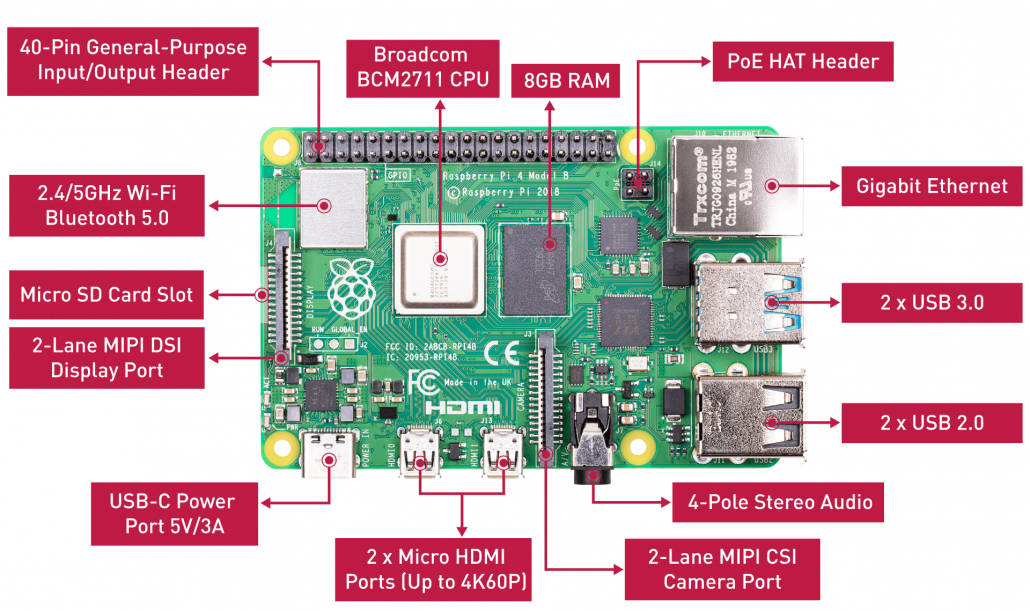
硬件配置

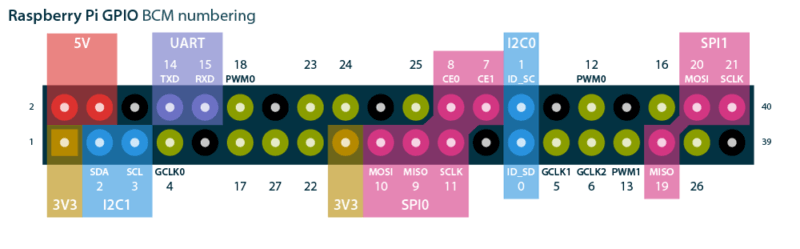
GPIO引脚定义

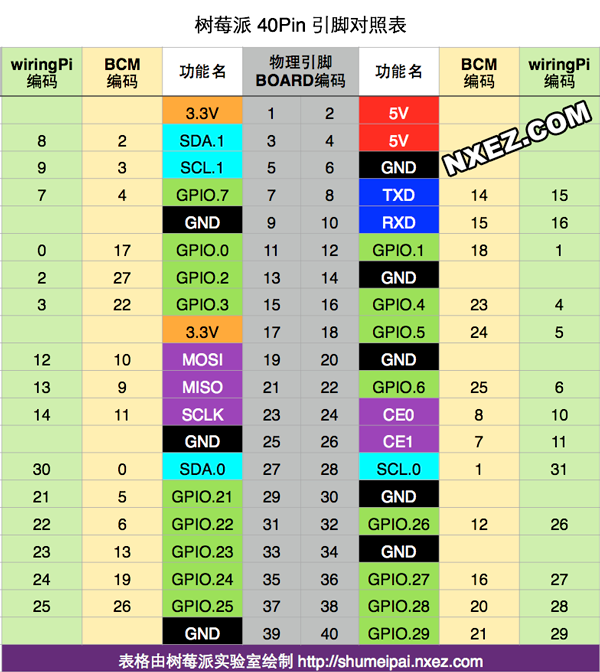
在实际使用中,我们应该熟悉树莓派接口的两种命名方案:
- WiringPi 编号:功接线的引脚号(如TXD、PWM0等等)
- BCM编号:是 Broadcom 针脚号,也即是通常称的GPIO
- 物理编号(Physical – Number):PCB板上针脚的物理位置对应的编号(1~40)
I2C接口
I2C是由Philips公司开发的一种简单、双向二线制同步串行总线。它只需要两根线即可在连接于总线上的器件之间传送信息。树莓派通过I2C接口可控制多个传感器和组件。它们的通信是通过SDA(数据引脚)和SCL(时钟速度引脚)来完成的。每个从设备都有一个唯一的地址,允许与许多设备间快速通信。ID_EEPROM引脚也是I2C协议,它用于与HATs通信。
SPI接口
SPI是串行外设接口,用于控制具有主从关系的组件,采用从进主出和主进从出的方式工作,树莓派上SPI由SCLK、MOSI、MISO接口组成,SCLK用于控制数据速度,MOSI将数据从树莓派发送到所连接的设备,而MISO则相反。
UART接口
有使用Arduino的朋友一定听说过UART或Serial,通用异步收/发器接口用于将Arduino连接到为其编程的计算机上,也用于其他设备与 RX 和 TX 引脚之间的通信。如果树莓派在 raspi-config 中启用了串口终端,则可以使用这些引脚通过电脑来控制树莓派,也可以直接用于控制Arduino。
PWM接口
在树莓派上,所有的引脚都可以实现软件PWM,而GPIO12、GPIO13、GPIO18、GPIO19可以实现硬件脉宽调制。
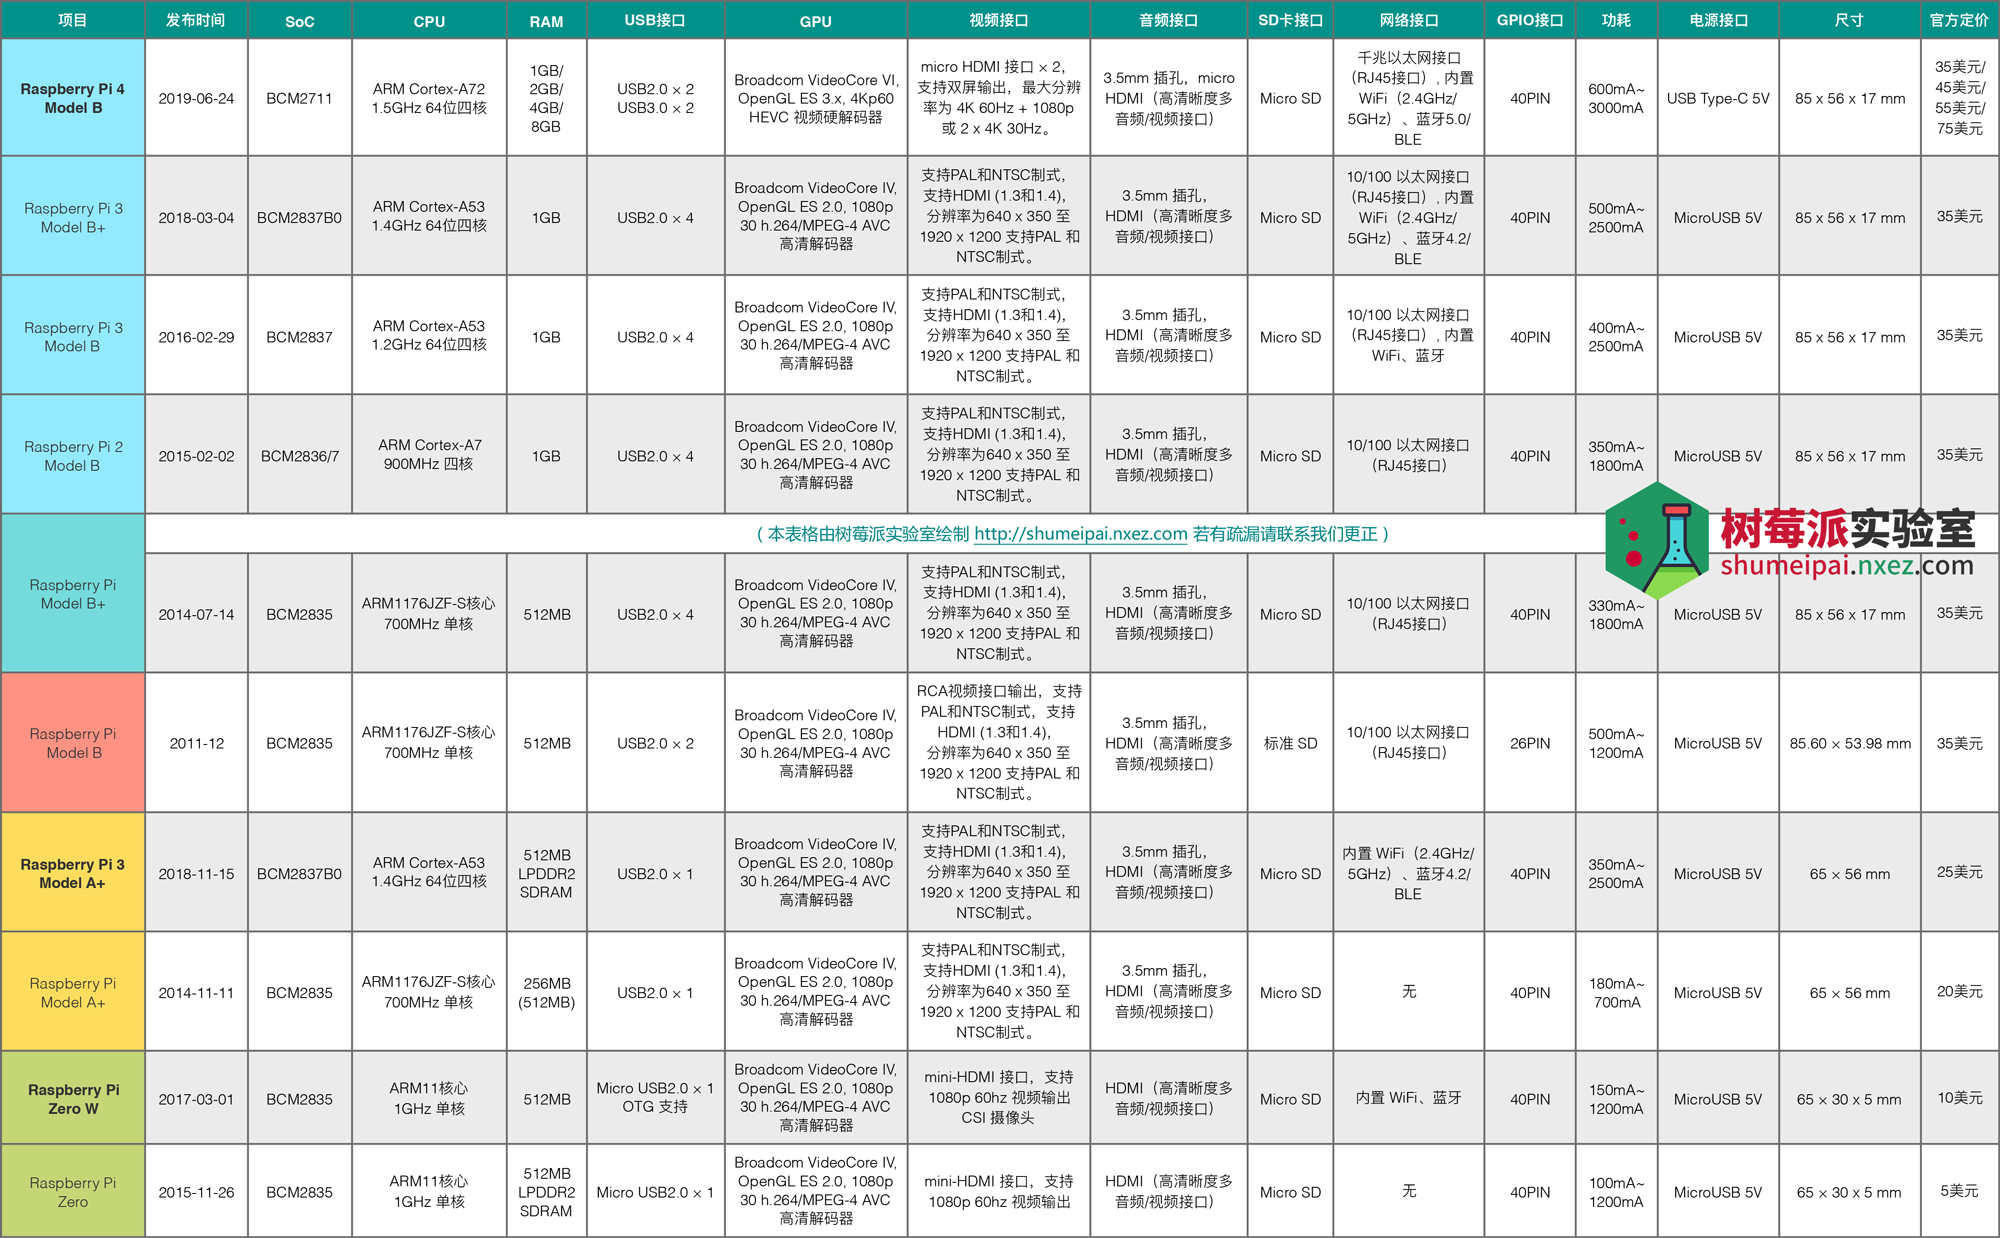
各型号配置对比
部分电子元件电路图:https://www.dazhuanlan.com/2019/12/26/5e043f4a96380/
二、Raspberry Pi Imager v2刻录OS
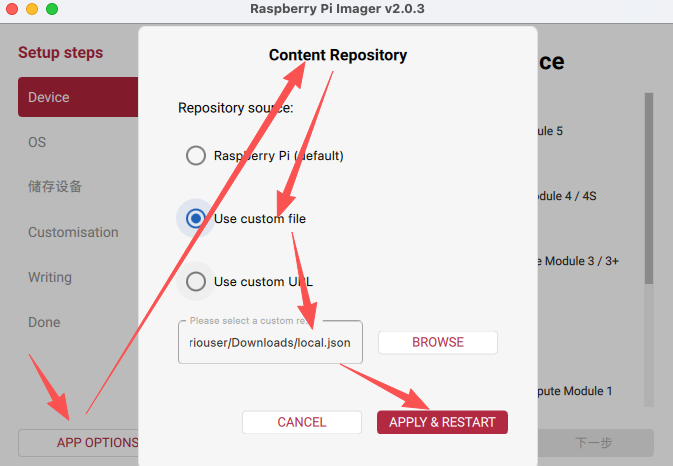
树莓派官方刻录软件 Raspberry Pi Imager v2既可以从网络边下载 OS 文件边刻录,又可以自定义从本地或指定链接加载 OS 文件进行直接刻录。
推荐从指定链接(HTTP协议链接)加载OS镜像文件,主要是使用他的UI定制化安装参数(如设置WIFI连接和用户密码)。从本地加载 OS 文件是无法使用参数设置的。
官方 imager的json文件链接:https://downloads.raspberrypi.com/os_list_imagingutility_v4.json
JSON文件结构:
{
  "imager": {
    "latest_version": "2.0.3",
    "url": "https://www.raspberrypi.com/software/",
    "devices": [
      {
        "name": "Raspberry Pi 5",
        "tags": [
          "pi5-64bit",
          "pi5-32bit"
        ],
        "icon": "https://downloads.raspberrypi.com/imager/icons/RPi_5.png",
        "description": "Raspberry Pi 5, 500 / 500+, and Compute Module 5",
        "matching_type": "exclusive",
        "capabilities": []
      },
      {
        "name": "Raspberry Pi 4",
        "tags": [
          "pi4-64bit",
          "pi4-32bit"
        ],
        "default": false,
        "icon": "https://downloads.raspberrypi.com/imager/icons/RPi_4.png",
        "description": "Raspberry Pi 4 Model B, 400, and Compute Module 4 / 4S",
        "matching_type": "inclusive",
        "capabilities": []
      },
      {
        "name": "No filtering",
        "tags": [],
        "default": false,
        "description": "Show every possible image",
        "matching_type": "inclusive",
        "capabilities": []
      }
    ]
  },
  "os_list": [
    {
      "name": "Custom Raspberry Pi OS (64-bit)",
      "description": "A port of Debian Trixie with the Raspberry Pi Desktop (Recommended)",
      "icon": "https://downloads.raspberrypi.com/raspios_armhf/Raspberry_Pi_OS_(32-bit).png",
      "url": "http://192.168.1.1:8078/os/raspios_full_arm64/images/raspios_full_arm64-2025-12-04/2025-12-04-raspios-trixie-arm64-full.img.xz",
      "extract_size": 6450839552,
      "extract_sha256": "19b108fe07cff2b5cd7df0f76b6d7325e43fb2a1d5418d10f6bd56642e0e8579",
      "image_download_size": 1327702860,
      "release_date": "2025-12-04",
      "init_format": "cloudinit-rpi",
      "devices": [
        "pi5-64bit",
        "pi4-64bit",
        "pi3-64bit"
      ]
    }
  ]
}
三、基础配置
1、设置USB SSD磁盘启动
参考:https://www.raspberrypi.com/documentation/computers/raspberry-pi.html#raspberry-pi-boot-eeprom
硬件准备
- 电源能达到 5V/3A(确保 SSD 能正常供电)
更新Bootloader
- 先使用Raspberry Pi Imager v2刻录软件在一个临时sd卡上安装Raspberry Pi OS系统(安装最新版)来更新Bootloader
- EEPROM的需要
Sep 3 2020之后的版本才能支持USB直接启动
# 更新系统及软件
apt update
apt full-upgrade -y

# 当前固件版本:
rpi-eeprom-update -d
# 如果你看到 2023 年 12 月 6 日或更晚的日期,则是必须要更新

# 使用raspi-config这个 TUI 更新bootloader
raspi-config
# 在 Advanced Options (高级选项)>下 Bootloader Version(引导加载程序版本),选择 Latest(最新)。然后 Finish键退出raspi-config。
reboot # 重启

# 重启之后再次查看
rpi-eeprom-update -a
使用raspi-config设置启动顺序
raspi-config
# Advanced Options(高级选项) → Boot Order(启动顺序)
# 选择 USB Boot (Retry SD)

# USB Boot            : 只尝试 USB 启动
# SD Boot             : 只从 SD 启动
# USB Boot (Retry SD) : USB 优先,失败时回退到 SD
# SD Boot (Retry USB) : SD 优先,失败时尝试 USB

保存并退出,选择Finish → Yes重启
验证 USB 启动配置
vcgencmd bootloader_config # 输出类似:BOOT_ORDER=0xf41 # 0xf41表示 USB → SD → 网络,最稳方案。 # f: USB # 4: SD 卡 # 1: 网络(PXE)之后使用Raspberry Pi Imager v2刻录软件刻录OS系统到SSD硬盘上,启动即可
2、远程连接操作
通过SSH连接进行CLI操作
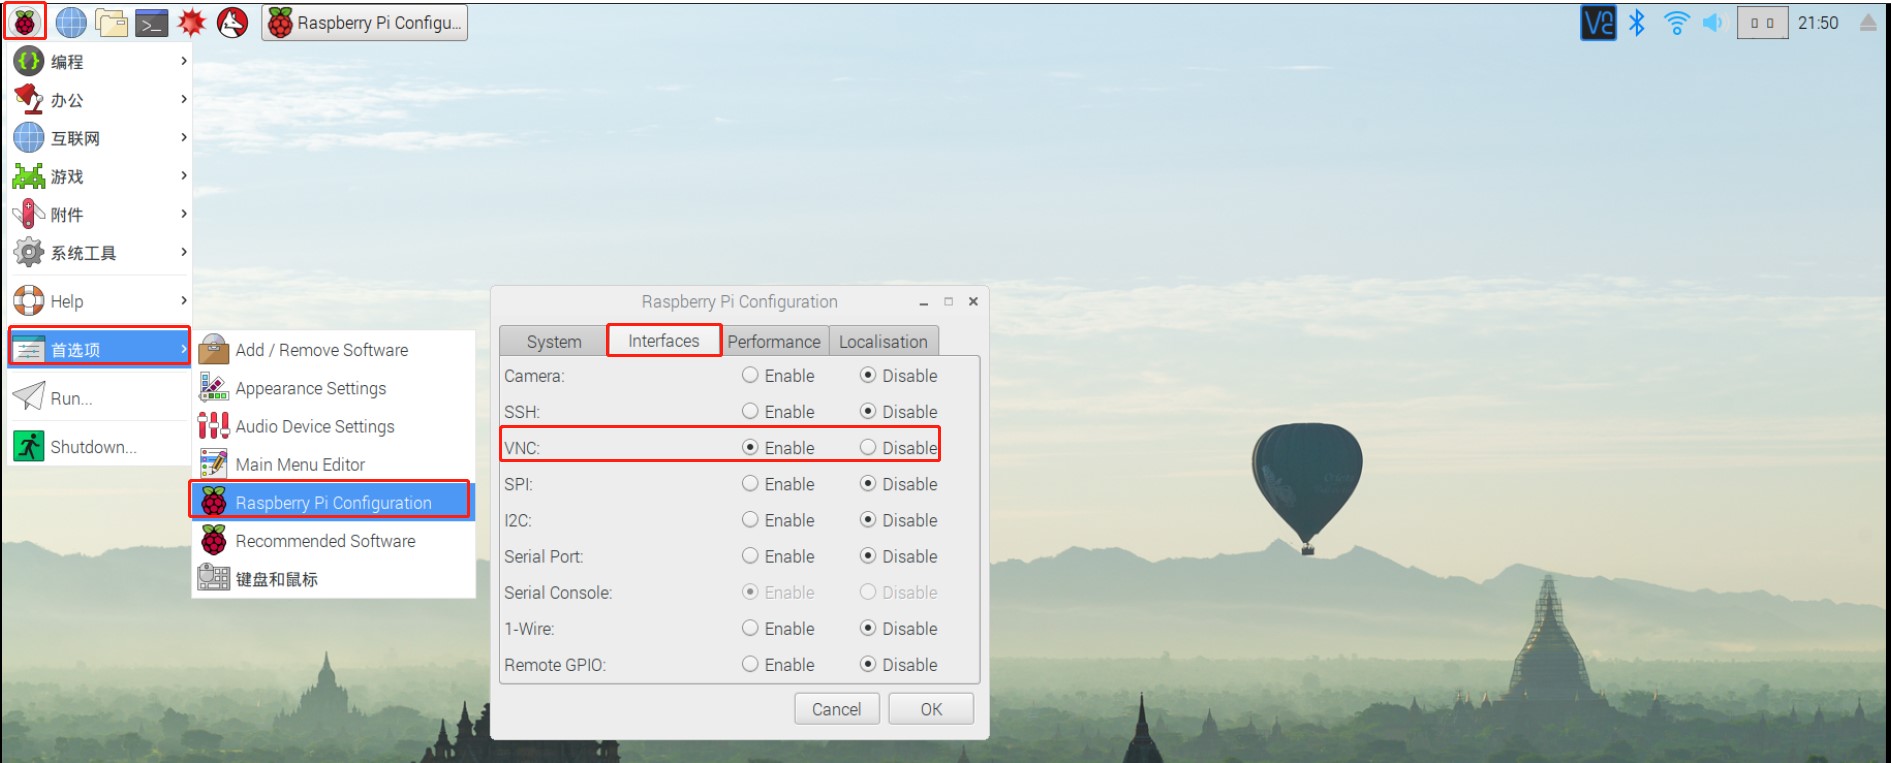
通过VNC连接远程桌面进行操作
树莓派开启VNC服务,然后重启
chrome安装VNC Viewer插件进行连接,插件地址:https://www.realvnc.com/en/connect/download/viewer/chrome/
3、基础配置
①连接隐藏wifi
编辑
/etc/wpa_supplicant/wpa_supplicant.confnetwork={ ssid=”wifi_name” scan_ssid=1 psk=”wifi_password” } # network:是一个连接WiFi网络的配置,可以有多个,wpa_supplicant会按照priority指定的优先级(数字越大越先连接)来连接,当然,在这个列表里面隐藏WiFi不受priority的影响,隐藏WiFi总是在可见WiFi不能连接时才开始连接。 # ssid:网络的ssid # psk:密码 # priority:连接优先级,越大越优先 # scan_ssid:连接隐藏WiFi时需要指定该值为1
nmcli device wifi connect "WiFi名称" password "WiFi密码"
/etc/NetworkManager/system-connections/wifi.nmconnection
[connection]
id=HomeWiFi
uuid=使用uuid命令可随机生成UUID
type=wifi
autoconnect=true

[wifi]
mode=infrastructure
ssid=你的WiFi名称

[wifi-security]
key-mgmt=wpa-psk
psk=你的WiFi密码

[ipv4]
method=auto
# 手动设置固定 IP 地址
# method=manual
# address1=192.168.1.220/24,192.168.1.1
# dns=192.168.1.1;
# dns-search=
# ignore-auto-dns=true
[ipv6]
method=auto
chmod 600 /etc/NetworkManager/system-connections/wifi.nmconnection
systemctl reload NetworkManager
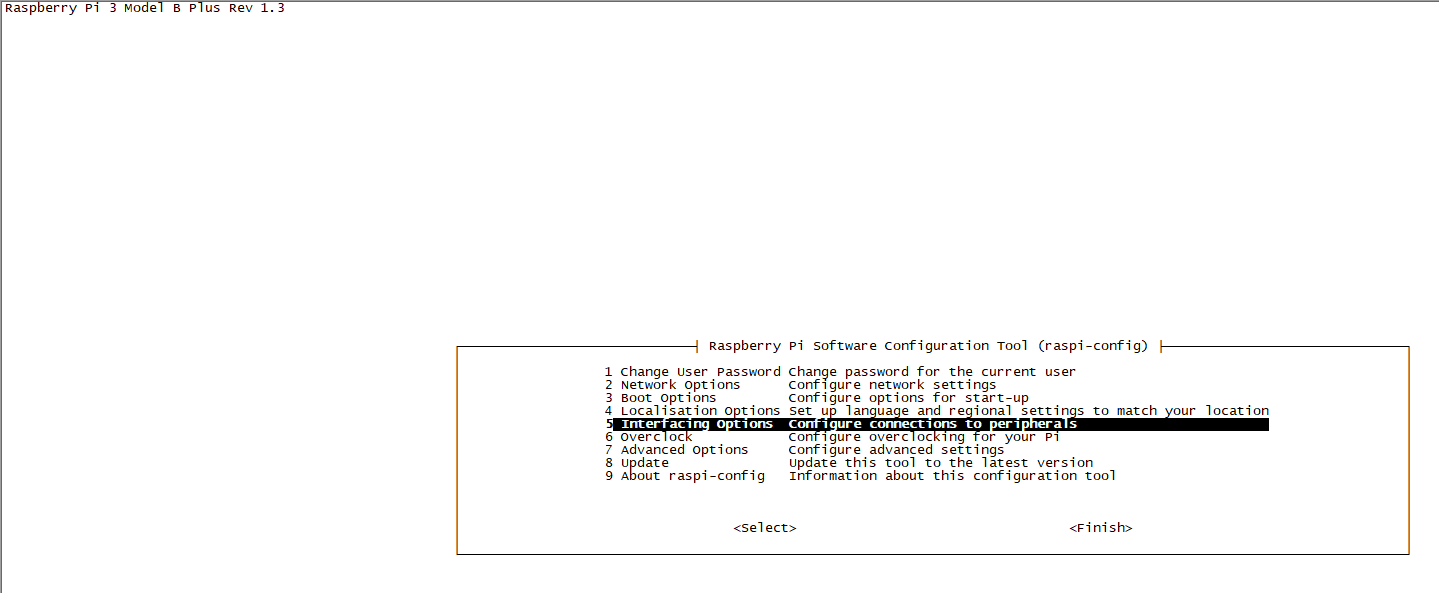
②CLI下配置Respbian
sudo raspi-config
③设置chromium浏览器代理
sudo echo -e 'export http_proxy="http://代理服务器地址:端口"\nexport https_proxy="https://代理服务器地址:端口"\nexport no_proxy="*.taobao.com,192.168.1.0/16"' >> /etc/environment
然后重启,打开chromium浏览器,安装Proxy SwitchyOmega插件。在Proxy SwitchyOmega插件中配置代理服务器。然后删除/etc/environment中新增的代理配置,重启。
④设置apt镜像源为阿里云镜像源
raspbian
mv /etc/apt/sources.list /etc/apt/sources.list.bak
echo -e "deb https://mirrors.aliyun.com/raspbian/raspbian/ buster main non-free contrib\ndeb-src https://mirrors.aliyun.com/raspbian/raspbian/ buster main non-free contrib" > /etc/apt/sources.list
apt update
Ubuntu 20.04
mv /etc/apt/sources.list /etc/apt/sources.list.bak
echo "deb https://mirrors.aliyun.com/ubuntu-ports focal main restricted" >> /etc/apt/sources.list
echo "deb https://mirrors.aliyun.com/ubuntu-ports focal-updates main restricted"  >>  /etc/apt/sources.list
echo "deb https://mirrors.aliyun.com/ubuntu-ports focal universe" >> /etc/apt/sources.list
echo "deb https://mirrors.aliyun.com/ubuntu-ports focal-updates universe" >> /etc/apt/sources.list
echo "deb https://mirrors.aliyun.com/ubuntu-ports focal multiverse" >> /etc/apt/sources.list
echo "deb https://mirrors.aliyun.com/ubuntu-ports focal-updates multiverse" >> /etc/apt/sources.list
echo "deb https://mirrors.aliyun.com/ubuntu-ports focal-backports main restricted universe multiverse" >> /etc/apt/sources.list
echo "deb https://mirrors.aliyun.com/ubuntu-ports focal-security main restricted" >> /etc/apt/sources.list
echo "deb https://mirrors.aliyun.com/ubuntu-ports focal-security universe" >> /etc/apt/sources.list
echo "deb https://mirrors.aliyun.com/ubuntu-ports focal-security multiverse" >> /etc/apt/sources.list
apt update
4、播放音频
apt install mpg123
mpg123 音频文件
mpg123 音频文件 </dev/null &
# 或者
apt-get install sox libsox-fmt-all
play 音频文件

# 或者
apt-get install cmus
cmus
5、调节音频输出音量大小
apt install alsa-utils
alsamixer # 指令会出现一个调节音量的界面。调节完成后按“ESC”退出
amixer set PCM 116%
6、vcgencmd命令查看硬件状态
①查看时钟频率
vcgencmd measure_clock [arm|core|h264|isp|v3d|uart|pwm|emmc|pixel|vec|hdmi|dpi]
②查看硬件电压
vcgencmd measure_volts [core|sdram_c|sdram_p]
③查看 BCM2835 Soc 温度
vcgencmd measure_temp
④查看解码器是否开启
vcgencmd codec_enabled [H264|MPG2|WVC1|MPG4|WMV9]
7、配置网络
Ubuntu
设置开机启动网卡
/etc/netplan/50-cloud-init.yaml
network:
    version: 2
    renderer: NetworkManager
    ethernets:
     eth0:
       dhcp4: true
       optional: true
    wifis:
       renderer: networkd
       wlan0:
         access-points:
           "WIFI SSID 名称":
              password: "WIFI 密码"
         dhcp4: true
         optional: true
上述文件中的WIFI密码可用wpa_passphrase命令进行加密:
wpa_passphrase "WIFI SSID 名称" "WIFI 密码"。输出的 PSK 值既可填入上述文件 password 字段。运行netplan apply以使更改生效。
手动启动网卡
ifconfig wlan0 down
ifconfig wlan0 up
四、安装特殊软件
1、安装 Docker
2、安装RStudio Server
apt-get install -y git r-recommended python-dev
cd /home/pi/Downloads/
git clone https://github.com/rstudio/rstudio.git
cd /home/pi/Downloads/rstudio/dependencies/common/
./install-common
cd /home/pi/Downloads/rstudio/dependencies/linux/
./install-dependencies-debian

#saw java 6 was not installed. installed v7
apt-get install -y openjdk-7-jdk

#tried to make install, got an error about dictionaries not installed and rerun install-dependencies
cd /home/pi/Downloads/rstudio/dependencies/common/
./install-common

#tried to make install, hangs at "ext:" so I tried manually installing pandoc, which should have been installed earlier, but apparently was not
apt-get install -y pandoc

#tried to make install, hangs at "ext:" so I tried installing the latest GWT compiler
cd /home/pi/Downloads
wget http://dl.google.com/closure-compiler/compiler-latest.zip
unzip compiler-latest.zip
rm COPYING README.md compiler-latest.zip
mv closure-compiler-v20170218.jar /home/pi/Downloads/rstudio/src/gwt/tools/compiler/compiler.jar

#build and install works!
cd /home/pi/Downloads/rstudio/
#remove build if exists
rm -r ./build
mkdir build
cd build
cmake .. -DRSTUDIO_TARGET=Server -DCMAKE_BUILD_TYPE=Release
make install
五、硬件集成
1、温度传感器DS18B20
树莓派没有数模转换器(ADC, Analog to Digital Converter),因此它不能够直接读取像TMP36这样的模拟信号温度传感器,因此,DS18B20是比较合适的。
测温原理
低温度系数晶振的振荡频率受温度影响很小,用于产生固定频率的脉冲信号发送给计数器1。高温度系数晶振随温度变化其振荡频率明显改变,所产生的信号作为计数器2的脉冲输入。计数器1和温度寄存器被预置在-55℃所对应的一个基数值。计数器1对低温度系数晶振产生的脉冲信号进行减法计数,当计数器1的预置值减到0时,温度寄存器的值将加1,计数器1的预置将重新被装入,计数器1重新开始对低温度系数晶振产生的脉冲信号进行计数,如此循环直到计数器2计数到0时,停止温度寄存器值的累加,此时温度寄存器中的数值即为所测温度。斜率累加器用于补偿和修正测温过程中的非线性,其输出用于修正计数器1的预置值。
DS18B20温度传感器技术性能描述:
- 独特的单线接口方式,DS18B20在与微处理器连接时仅需要一条口线即可实现微处理器与DS18B20的双向通讯。
- 测温范围 -55℃~+125℃,固有测温误差1℃。在摄氏度-10 ° C至+85 ° C范围内精度为±0.5 ° C
- 支持多点组网功能,多个DS18B20可以并联在唯一的三线上,最多只能并联8个,实现多点测温,如果数量过多,会使供电电源电压过低,从而造成信号传输的不稳定。
- 工作电源: 3.0~5.5V/DC (可以数据线寄生电源)
- 在使用中不需要任何外围元件
- 测量结果以9~12位数字量方式串行传送
- 不锈钢保护管直径 Φ6
- 适用于DN15~25, DN40~DN250各种介质工业管道和狭小空间设备测温
- 标准安装螺纹 M10X1, M12X1.5, G1/2”任选
- PVC电缆直接出线或德式球型接线盒出线,便于与其它电器设备连接。
尽管DS18B20看上去就像一个普通的传感器,但它内部其实大有文章。
它的芯片包含了一个特别的单总线串行接口,逻辑控制部分以及一个温度传感器。
它的输出针输出数字消息以便Raspbian能够在某一针上阅读。
DS18B20是常用的数字温度传感器,其输出的是数字信号,具有体积小,硬件开销低,抗干扰能力强,精度高的特点。
2012年12月之后的Raspbian系统已经能够支持DS18B20单总线(1-wire)温度传感器。
传感器由半导体包裹的头和三个引脚组成,它是一种精确地数字设备
DS18B20单总线(1-wire)传感器可以以非并行连接接入,这一点几乎与其他市售的传感器都不同!所有传感器共享相同的针脚,所以你只需要一个4.7k的电阻就够了
电阻被用于拉高数据输出线(data-line),并且保持数据输出的稳定。
w1-gpio是单总线的IO操作模块,用于模拟单总线时序;
w1_therm是DS18B20的内部操作模块(读写寄存器),和IO时序无关; 我们可以将驱动结构看成是将w1_therm挂接到w1-gpio总线上,由w1-gpio控制w1_therm工作。
modprobe命令用于向内核中加载模块或者从内核中移除模块。
在2015-02-16之後的Raspbain版本,为了防止GPIO的冲突,使用了新的设备树DT(Device Tree)策略。Raspberry Pi的最新内核和固件(包括Raspbian和NOOBS版本)现在默认使用设备树DT来管理某些资源分配和模块加载。
在新内核boot分区下多了个overlays文件夹,里面有很多dtb文件,这些其实就是树莓派的设备树,打开README,就可以知道该怎么使用了。可以查看相关说明文件/boot/overlays/README
- w1-gpio
名称:w1-gpio
信息:配置w1-gpio一线接口模块。
如果不需要GPIO驱动外部上拉使用这个覆盖(overlay)。
加载:dtoverlay=w1-gpio,\
- w1-gpio-pullup
名称:w1-gpio-pullup
信息:配置w1-gpio一线接口模块。
如果需要GPIO驱动外部上拉使用这个覆盖(overlay)。
加载:dtoverlay=w1-gpio-pullup,=
/boot/config.txt ----> /boot/firmware/config.txt
# 使用 GPIO4 (默认)
dtoverlay=w1-gpio,gpiopin=4
dtoverlay=w1-gpio-pullup,gpiopin=4

# 显式指定 GPIO 和上拉选项
# dtoverlay=w1-gpio,gpiopin=4,pullup=on
#    gpiopin:指定物理的 Broadcom GPIO 编号(BCM),默认通常为 4
#    pullup:在某些 Raspberry Pi 型号上需要显式开启上拉。通常硬件上已经有 4.7k 上拉电阻,所以 pullup=on 可选。
sudo dtoverlay w1-gpio gpiopin=4 pullup=0  # header pin 7
sudo reboot
modprobe w1-gpio
modprobe w1-therm

cd /sys/bus/w1/devices/28-00000xxxxxxx  # 28 是 DS18B20 的族代码
cat w1_slave
输出示例:
4f 01 4b 46 7f ff 0c 10 5e : crc=5e YES
4f 01 4b 46 7f ff 0c 10 5e t=23125

# 第一行末尾 `YES` 表示 CRC 校验通过。
#  第二行 `t=23125` 表示温度,单位是毫摄氏度(此例 23.125°C)。