Python/R语言多用户工作台JupyterHub/RStuido
一、Jupyter简介
Jupyter是一款基于python的web notebook服务,目前有大多python数据挖掘与机器学习爱好者使用这款服务,其特性其实与Ipytohn Notebook差不多,准确说Ipython Notebook是一款提供增强型交互的功能的shell,而Jupyter除了Ipython的功能,还加入了普通编辑器的通用功能,是一款带代码交互的动态文档web编辑器
二、安装及命令详解
1、各种方式安装
二进制安装
以Ubuntu为例
apt-get install npm python3-pip
npm config set registry https://registry.npm.taobao.org --global
mkdir ~/.pip
echo -e "[global]\nindex-url = https://mirrors.aliyun.com/pypi/simple/\n[install]\ntrusted-host=mirrors.aliyun.com\n" > ~/.pip/pip.conf
python3 -m pip install jupyterhub notebook
npm install -g configurable-http-proxy
生成默认配置文件
jupyterhub --generate-config
修改配置文件~/jupyterhub_config.py并启动jupyterhub
nohup jupyterhub -f ~/jupyterhub_config.py 2>&1 >> /var/log/jupyterhub.log &
echo $! > /var/log/jupyterhub.pid

# 或者
nohup jupyterhub  -f ~/jupyterhub_config.py 2>&1 >> /var/log/jupyterhub.log &!
echo $! > /var/log/jupyterhub.pid
docker安装
version: "3"
services:
  jupyterhub:
    image: jupyterhub/jupyterhub:4.0.2
    container_name: jupyterhub
    restart: always
    ports:
      - "8000:8000"
    environment:
      TZ: Asia/Shanghai
    volumes:
      - /root/jupyterhub/data:/home
kubernetes安装
helm repo add jupyterhub https://jupyterhub.github.io/helm-chart/ && \
helm repo update

RELEASE=jhub
NAMESPACE=jhub
helm upgrade --cleanup-on-fail \
  --install $RELEASE jupyterhub/jupyterhub \
  --namespace $NAMESPACE \
  --create-namespace \
  --version=0.9.0 \
  --values config.yaml
2、jupyterhub 命令详解
命令格式
jupyterhub cmd [args]
全局命令参数
--debug
    set log level to logging.DEBUG (maximize logging output)
--generate-config
    generate default config file
--generate-certs
    generate certificates used for internal ssl
--no-db
    disable persisting state database to disk
--upgrade-db
    Automatically upgrade the database if needed on startup.

    Only safe if the database has been backed up.
    Only SQLite database files will be backed up automatically.
--no-ssl
    [DEPRECATED in 0.7: does nothing]
--base-url=<URLPrefix> (JupyterHub.base_url)
    Default: '/'
    The base URL of the entire application.
    Add this to the beginning of all JupyterHub URLs. Use base_url to run
    JupyterHub within an existing website.
    .. deprecated: 0.9
        Use JupyterHub.bind_url
-y <Bool> (JupyterHub.answer_yes)
    Default: False
    Answer yes to any questions (e.g. confirm overwrite)
--ssl-key=<Unicode> (JupyterHub.ssl_key)
    Default: ''
    Path to SSL key file for the public facing interface of the proxy
    When setting this, you should also set ssl_cert
--ssl-cert=<Unicode> (JupyterHub.ssl_cert)
    Default: ''
    Path to SSL certificate file for the public facing interface of the proxy
    When setting this, you should also set ssl_key
--url=<Unicode> (JupyterHub.bind_url)
    Default: 'http://:8000'
    The public facing URL of the whole JupyterHub application.
    This is the address on which the proxy will bind. Sets protocol, ip,
    base_url
--ip=<Unicode> (JupyterHub.ip)
    Default: ''
    The public facing ip of the whole JupyterHub application (specifically
    referred to as the proxy).
    This is the address on which the proxy will listen. The default is to listen
    on all interfaces. This is the only address through which JupyterHub should
    be accessed by users.
    .. deprecated: 0.9
        Use JupyterHub.bind_url
--port=<Int> (JupyterHub.port)
    Default: 8000
    The public facing port of the proxy.
    This is the port on which the proxy will listen. This is the only port
    through which JupyterHub should be accessed by users.
    .. deprecated: 0.9
        Use JupyterHub.bind_url
--pid-file=<Unicode> (JupyterHub.pid_file)
    Default: ''
    File to write PID Useful for daemonizing JupyterHub.
--log-file=<Unicode> (JupyterHub.extra_log_file)
    Default: ''
    DEPRECATED: use output redirection instead, e.g.
    jupyterhub &>> /var/log/jupyterhub.log
--log-level=<Enum> (Application.log_level)
    Default: 30
    Choices: (0, 10, 20, 30, 40, 50, 'DEBUG', 'INFO', 'WARN', 'ERROR', 'CRITICAL')
    Set the log level by value or name.
-f <Unicode> (JupyterHub.config_file)
    Default: 'jupyterhub_config.py'
    The config file to load
--config=<Unicode> (JupyterHub.config_file)
    Default: 'jupyterhub_config.py'
    The config file to load
--db=<Unicode> (JupyterHub.db_url)
    Default: 'sqlite:///jupyterhub.sqlite'
    url for the database. e.g. `sqlite:///jupyterhub.sqlite`
子命令
token:生成用户API token
命令格式
jupyterhub token [username]
命令参数
--log-level=<Enum> (Application.log_level)
    Default: 30
    Choices: (0, 10, 20, 30, 40, 50, 'DEBUG', 'INFO', 'WARN', 'ERROR', 'CRITICAL')
    Set the log level by value or name.
-f <Unicode> (JupyterHub.config_file)
    Default: 'jupyterhub_config.py'
    The config file to load
--config=<Unicode> (JupyterHub.config_file)
    Default: 'jupyterhub_config.py'
    The config file to load
--db=<Unicode> (JupyterHub.db_url)
    Default: 'sqlite:///jupyterhub.sqlite'
    url for the database. e.g. `sqlite:///jupyterhub.sqlite`

# 示例
$> jupyterhub token kaylee
ab01cd23ef45
3、其他命令
Jupyter kernel的管理
jupyter-kernelspec list
jupyter-kernelspec install
jupyter-kernelspec uninstall
jupyter-kernelspec remove
三、Jupyter功能扩展
1、使用LDAP进行用户认证
Github:https://github.com/jupyterhub/ldapauthenticator
pip3 install jupyterhub-ldapauthenticator
c.JupyterHub.authenticator_class = 'ldapauthenticator.LDAPAuthenticator'
#c.LDAPAuthenticator.server_address = '192.168.1.7'
c.LDAPAuthenticator.server_hosts = ['ldap://192.168.1.7:389']
c.LDAPAuthenticator.bind_user_dn = 'uid=root,cn=users,dc=ldap,dc=synology,dc=curiouser,dc=com'
c.LDAPAuthenticator.bind_user_password = 'jL6u49t5A9P5'
c.LDAPAuthenticator.user_search_base = 'cn=users,dc=ldap,dc=synology,dc=curiouser,dc=com'
c.LDAPAuthenticator.user_search_filte = '(&(memberOf=cn=jupyterhub,cn=groups,dc=ldap,dc=synology,dc=curiouser,dc=com)(cn={0}))'
c.LDAPAuthenticator.user_attribute = 'cn'
c.LDAPAuthenticator.create_user_home_dir = True
c.LDAPAuthenticator.create_user_home_dir_cmd = ['mkhomedir_helper']


c.LDAPAuthenticator.lookup_dn = True
c.LDAPAuthenticator.lookup_dn_search_filter = '({login_attr}={login})'
c.LDAPAuthenticator.lookup_dn_search_user = 'ldap_search_user_technical_account'
c.LDAPAuthenticator.lookup_dn_search_password = 'secret'
c.LDAPAuthenticator.user_search_base = 'ou=people,dc=wikimedia,dc=org'
c.LDAPAuthenticator.user_attribute = 'sAMAccountName'
c.LDAPAuthenticator.lookup_dn_user_dn_attribute = 'cn'
c.LDAPAuthenticator.escape_userdn = False
c.LDAPAuthenticator.bind_dn_template = '{username}'
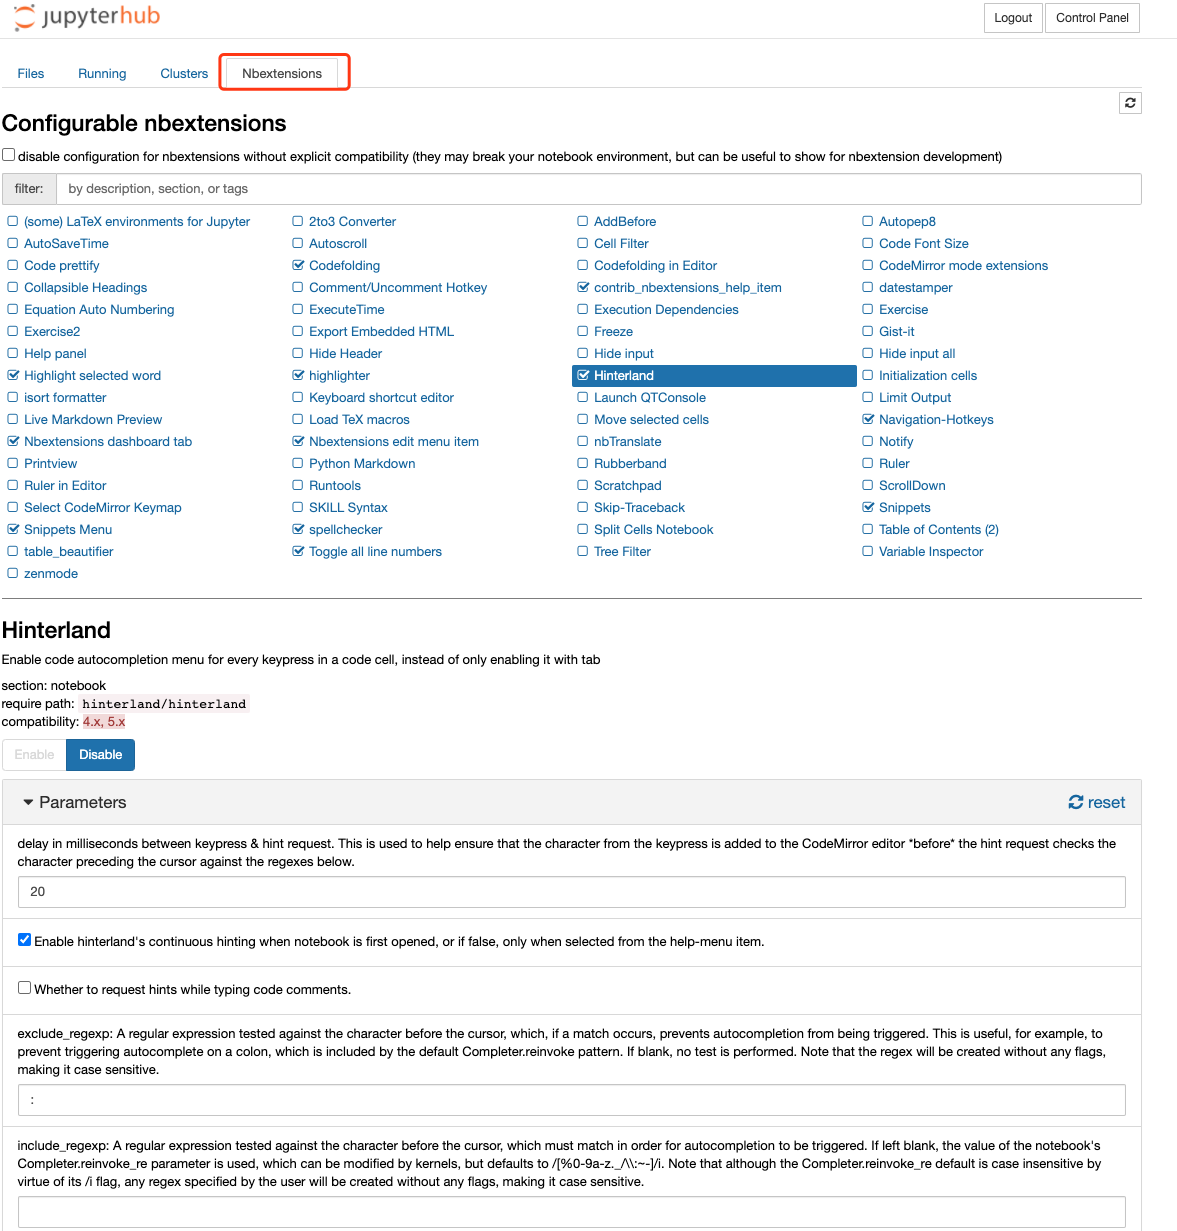
2、添加扩展插件管理器
pip3 install jupyter_contrib_nbextensions
# 安装完之后需要配置 nbextension,注意配置的时候要确保已关闭Jupyter Notebook
jupyter contrib nbextension install --skip-running-check
# 命令执行完后,会生成配置文件/usr/local/etc/jupyter/jupyter_nbconvert_config.json
重新启动 Jupyterhub后,上面选项栏会出现 Nbextensions 的选项。
3、支持R语言kernel
安装R语言
apt-get install r-base r-base-core r-base-dev
pip3 install jupyterlab
R安装基础工具
R > install.packages(c('pbdZMQ', 'repr', 'devtools', 'IRkernel'))
R > IRkernel::installspec(user = FALSE)
# 安装完成后会在目录/root/.local/share/jupyter/kernels/ir生成一份配置信息

jupyter labextension install @techrah/text-shortcuts
# 刷新页面就可以看到R的kernel了!
参考:https://irkernel.github.io/installation/
四、R语言
1、安装
①包管理器安装
以Ubuntu 18.04 bionic安装R 4.x.x版本 为例(包管理器默认仓库的R版本大多是3.x.x)
echo "deb https://mirrors.tuna.tsinghua.edu.cn/CRAN/bin/linux/ubuntu bionic-cran40/">> /etc/apt/sources.list.d/r-tuna.list
apt-key adv --keyserver keyserver.ubuntu.com --recv-keys E298A3A825C0D65DFD57CBB651716619E084DAB9
apt-get update
apt-get install r-base r-base-dev
②源码编译安装
apt-get install libxt-dev libcurl4-openssl-dev
export R_VERSION=4.3.2
curl -O "https://cran.rstudio.com/src/base/R-4/R-${R_VERSION}.tar.gz"
tar -xzvf R-${R_VERSION}.tar.gz
cd R-${R_VERSION}
JAVA_HOME=/opt/java  ./configure \
    --prefix=/opt/R/4.3.2\
    --enable-R-shlib \
    --enable-memory-profiling \
    --with-blas \
    --with-lapack \
    --enable-R-shlib

# --prefix Specifies the directory where R is installed when executing make install. Change this to install R at a different location than /opt/R/${R_VERSION}.
# --enable-R-shlib Required to use R with RStudio.
# --enable-memory-profiling    Enables support for Rprofmem() and tracemem(), used to measure memory use in R code.
# --with-blas, --with-lapack  Configures R to link against external BLAS and LAPACK libraries on the system. Recommended only on Ubuntu/Debian, where the alternatives system may be used to switch the BLAS library at runtime. If unspecified, R uses an internal BLAS library that can be switched at runtime. See Configure R to use a different BLAS library for more details.


make
make install
/opt/R/4.3.2/bin/R --version

ln -s /opt/R/4.3.2/bin/R /usr/local/bin/R432
ln -s /opt/R/4.3.2/bin/Rscript /usr/local/bin/RscriptR432
2、包的管理
https://cloud.r-project.org/bin/linux/ubuntu/bionic-cran40/
包的安装
从镜像源仓库安装
# 在R CLI中
install.packages("RMySQL",repos="https://mirrors.ustc.edu.cn/CRAN")
install.packages("ape")
# 在linux命令行
su - -c "R -e \"install.packages('shiny', repos='https://cran.rstudio.com/')\""
从包文件安装
# 在R CLI中
install.packages("/root/mgcv_1.8-29.tar.gz", repos = NULL,type="source")
    # 或者
packageurl <- "https://cran.rstudio.com/bin/macosx/contrib/4.0/mgcv_1.8-23.tgz"
install.packages(packageurl, repos=NULL, type="source")
# 在linux命令行
R CMD INSTALL package.tar.gz
包的查看
installed.packages()
包的删除
remove. packages(c("pkg1","pkg2") , lib = file .path("path", "to", "library"))

# shili
remove.packages("mgcv", lib="/usr/lib/R/library")
包的清除
detach("package:rjson")
包的加载
library(rjson)
require(rjson)---便于写脚本特性
3、升级R 3.x.x到4.x.x
Windows下
# 安装包,如果已经有此包可跳过此步骤
install.packages("installr")

# 加载包,升级
library(installr)
updateR()
Ubuntu下
参考:https://cloud.r-project.org/bin/linux/ubuntu/#get-5000-cran-packages
apt update -qq
apt install --no-install-recommends software-properties-common dirmngr
apt-key adv --keyserver keyserver.ubuntu.com --recv-keys E298A3A825C0D65DFD57CBB651716619E084DAB9

# 添加CRAN的R 4.0仓库
add-apt-repository "deb https://cloud.r-project.org/bin/linux/ubuntu $(lsb_release -cs)-cran40/"
apt-get install r-base-dev
五、RStudio Server
1、简介
RStudio分为桌面版、Web服务端版。这种两种类型都有开源和商业版本
官方文档:https://docs.rstudio.com/ide/server-pro/1.2.1293-1/index.html
2、安装
①YUM( RedHat / CentOS 6+)
参考:https://cran.rstudio.com/bin/linux/redhat/
yum install -y epel-release
yum install <rstudio-server-package.rpm>
# 或者
gpg --keyserver keys.gnupg.net --recv-keys 3F32EE77E331692F
gpg --armor --export 3F32EE77E331692F > rstudio-code-signing.key
rpm --import rstudio-code-signing.key
rpm -K <rstudio-server-package.rpm>
②APT( Debian 8+ / Ubuntu 12.04+)
文档:https://cran.rstudio.com/bin/linux/ubuntu/
apt-get install r-base

# 或者
gpg --keyserver keys.gnupg.net --recv-keys 3F32EE77E331692F
dpkg-sig --verify <rstudio-server-package.deb>
③Docker-compose
services:
  rstudio-server:
    image: rocker/rstudio:4.3.2
    container_name: rstudio-server
    hostname: rstudio-server
    restart: always # 设置容器自启模式
    ports:
      - "8087:8787"
    environment:
      TZ: Asia/Shanghai # 设置容器时区与宿主机保持一致
      PASSWORD: 123456 # 设置root密码
      ROOT: true
      USERID: 1001
      GROUPID: 1001
    volumes:
      - ./workspace:/home/
参考:
- https://github.com/rocker-org/rocker/wiki
- https://github.com/rocker-org/rocker/wiki/Using-the-RStudio-image#multiple-users
3、配置
①配置多版本 R
https://support.posit.co/hc/en-us/articles/226872207-Managing-R-versions-in-RStudio-Connect
4、测试代码
install.packages('RMySQL')
library(RMySQL)
# 创建数据库连接
con<-dbConnect(MySQL(),host='192.168.1.1',port=3306,dbname="test",user="test",password="************")
# 查询数据库表
result <- dbGetQuery(con, "show tables;")
# 打印查询结果
print(result)
# 关闭数据库连接
dbDisconnect(con)