Cloudera 5.11安装部署
一、主机规划
| 主机角色 | Host Name | IP | 硬件 | 外挂硬盘及挂载目录大小 | 额外服务角色 |
|---|---|---|---|---|---|
| Cloudera Manger | cm.cloudera.curiouser.com | 172.16.7.2 | 16C32G | 500G /data 500G /var 50G /opt | HTTPD,MySQL |
| Master1 | master1.cloudera.curiouser.com | 172.16.7.3 | 16C64G | 500G /data 500G /var 50G /opt | |
| Master2 | master2.cloudera.curiouser.com | 172.16.7.4 | 16C32G | 500G /data 500G /var 50G /opt | |
| Node1 | node1.cloudera.curiouser.com | 172.16.7.5 | 16C32G | 500G /data 500G /var 50G /opt | |
| Node2 | node2.cloudera.curiouser.com | 172.16.7.6 | 16C32G | 500G /data 500G /var 50G /opt | |
| Node3 | node3.cloudera.curiouser.com | 172.16.7.7 | 16C32G | 500G /data 500G /var 50G /opt |
二、Prerequisite
0. 关闭所有主机的SELinux,防火墙,IPV6,透明大页,禁止内存交换
systemctl stop firewalld  &&\
systemctl disable firewalld ;\
systemctl stop iptables &&\
systemctl disable iptables;\
systemctl stop ip6tables &&\
systemctl disable ip6tables ;\
setenforce 0 &&\
sed -i 's/SELINUX=enforcing/SELINUX=disabled/' /etc/sysconfig/selinux ;\
echo never > /sys/kernel/mm/transparent_hugepage/enabled &&\
echo never > /sys/kernel/mm/transparent_hugepage/defrag ;\
echo 'GRUB_CMDLINE_LINUX="transparent_hugepage=never"' >> /etc/default/grub &&\
grub2-mkconfig -o /boot/grub2/grub.cfg &&\
sed -i '$a NETWORKING_IPV6=no' /etc/sysconfig/network &&\
echo "net.ipv6.conf.all.disable_ipv6=1" >> /etc/sysctl.conf &&\
sysctl -p &&\
cat /proc/sys/net/ipv6/conf/all/disable_ipv6 ;\
sysctl vm.swappiness=0 &&\
echo " vm.swappiness = 0" >> /etc/sysctl.conf
1. 设置主机名,所有主机配置hosts域名IP 地址映射
hostnamectl --static set-hostname cm.cloudera.curiouser.com ;\
sed -i '$d' /etc/hosts ;\
echo "172.16.7.2 cm.cloudera.curiouser.com" >> /etc/hosts ;\
echo "172.16.7.3 master1.cloudera.curiouser.com" >> /etc/hosts ;\
echo "172.16.7.4 master2.cloudera.curiouser.com" >> /etc/hosts ;\
echo "172.16.7.5 node1.cloudera.curiouser.com" >> /etc/hosts ;\
echo "172.16.7.6 node2.cloudera.curiouser.com" >> /etc/hosts ;\
echo "172.16.7.7 node3.cloudera.curiouser.com" >> /etc/hosts  ;\
reboot now

hostnamectl --static set-hostname master1.cloudera.curiouser.com ;\
sed -i '$d' /etc/hosts ;\
echo "172.16.7.3 master1.cloudera.curiouser.com" >> /etc/hosts ;\
echo "172.16.7.2 cm.cloudera.curiouser.com" >> /etc/hosts ;\
echo "172.16.7.4 master2.cloudera.curiouser.com" >> /etc/hosts ;\
echo "172.16.7.5 node1.cloudera.curiouser.com" >> /etc/hosts ;\
echo "172.16.7.6 node2.cloudera.curiouser.com" >> /etc/hosts ;\
echo "172.16.7.7 node3.cloudera.curiouser.com" >> /etc/hosts ;\
reboot now

hostnamectl --static set-hostname master2.cloudera.curiouser.com ;\
sed -i '$d' /etc/hosts ;\
echo "172.16.7.4 master2.cloudera.curiouser.com" >> /etc/hosts ;\
echo "172.16.7.2 cm.cloudera.curiouser.com" >> /etc/hosts ;\
echo "172.16.7.3 master1.cloudera.curiouser.com" >> /etc/hosts ;\
echo "172.16.7.5 node1.cloudera.curiouser.com" >> /etc/hosts ;\
echo "172.16.7.6 node2.cloudera.curiouser.com" >> /etc/hosts ;\
echo "172.16.7.7 node3.cloudera.curiouser.com" >> /etc/hosts ;\
reboot now

hostnamectl --static set-hostname node1.cloudera.curiouser.com ;\
sed -i '$d' /etc/hosts ;\
echo "172.16.7.5 node1.cloudera.curiouser.com" >> /etc/hosts ;\
echo "172.16.7.2 cm.cloudera.curiouser.com" >> /etc/hosts ;\
echo "172.16.7.3 master1.cloudera.curiouser.com" >> /etc/hosts ;\
echo "172.16.7.4 master2.cloudera.curiouser.com" >> /etc/hosts ;\
echo "172.16.7.6 node2.cloudera.curiouser.com" >> /etc/hosts ;\
echo "172.16.7.7 node3.cloudera.curiouser.com" >> /etc/hosts ;\
reboot now

hostnamectl --static set-hostname node2.cloudera.curiouser.com ;\
sed -i '$d' /etc/hosts ;\
echo "172.16.7.6 node2.cloudera.curiouser.com" >> /etc/hosts ;\
echo "172.16.7.2 cm.cloudera.curiouser.com" >> /etc/hosts ;\
echo "172.16.7.3 master1.cloudera.curiouser.com" >> /etc/hosts ;\
echo "172.16.7.4 master2.cloudera.curiouser.com" >> /etc/hosts ;\
echo "172.16.7.5 node1.cloudera.curiouser.com" >> /etc/hosts ;\
echo "172.16.7.7 node3.cloudera.curiouser.com" >> /etc/hosts ;\
reboot now

hostnamectl --static set-hostname node3.cloudera.curiouser.com ;\
sed -i '$d' /etc/hosts ;\
echo "172.16.7.7 node3.cloudera.curiouser.com" >> /etc/hosts ;\
echo "172.16.7.2 cm.cloudera.curiouser.com" >> /etc/hosts ;\
echo "172.16.7.3 master1.cloudera.curiouser.com" >> /etc/hosts ;\
echo "172.16.7.4 master2.cloudera.curiouser.com" >> /etc/hosts ;\
echo "172.16.7.5 node1.cloudera.curiouser.com" >> /etc/hosts ;\
echo "172.16.7.6 node2.cloudera.curiouser.com" >> /etc/hosts ;\
reboot now
2. 将CM主机配置成内网CentOS 、CM、CDH、Parcels、MySQL安装包的YUM源
所有主机备份自带的YUM源配置文件
mkdir /etc/yum.repos.d/bak ;\
mv /etc/yum.repos.d/r* /etc/yum.repos.d/bak/ ;\
yum clean all
上传系统镜像ISO文件到CM节点的/mnt目录下
CM节点挂载系统镜像ISO文件并配置本地YUM源
echo "/mnt/rhel-server-7.4-x86_64-dvd.iso /mnt/cdrom iso9660 defaults,loop 0 0" >> /etc/fstab ;\
mkdir -p /mnt/cdrom ;\
mount -a ;\
bash -c 'cat > /etc/yum.repos.d/local.repo <<EOF
[rhel74]
name = rhel74
baseurl = file:///mnt/cdrom
gpgcheck = 0
EOF' ;\
yum clean all ;\
yum makecache ;\
yum repolist
配置CM节点为YUM源
yum install -y httpd telnet net-tools wget  createrepo;\
ln -s /mnt/cdrom/ /var/www/html/rhel74 ;\
systemctl enable httpd ;\
systemctl start httpd ;\
rm -rf /etc/yum.repos.d/local.repo ;\
bash -c 'cat > /etc/yum.repos.d/rhel74.repo <<EOF
[rhel74]
name = rhel74
baseurl = http://cm.cloudera.curiouser.com/rhel74
gpgcheck = 0
EOF' ;\
yum clean all ;\
yum makecache ;\
yum repolist
上传CM、MySQL、JDK、CDH,Spark,Kafka的parcels包相关的安装包到CM主机的/var/www/html/目录下
CM相关的RPM官网下载地址:https://archive.cloudera.com/cm6/
CDH相关的RPM官网下载地址:https://archive.cloudera.com/cdh6/
bash -c 'cat > /etc/yum.repos.d/cm5.repo <<EOF
[ClouderaManager5.11.1]
name = Cloudera Manager 5.11.1
baseurl = http://cm.cloudera.curiouser.com/cloudera/cm/5.11.1
gpgcheck = 0
EOF' ;\
bash -c 'cat > /etc/yum.repos.d/mysql57.repo  <<EOF
[mysql57]
name=MysSQL 5.7
baseurl=http://cm.cloudera.curiouser.com/mysql/5.7.19/
gpgcheck=0
EOF' ;\
yum clean all ;\
yum makecache
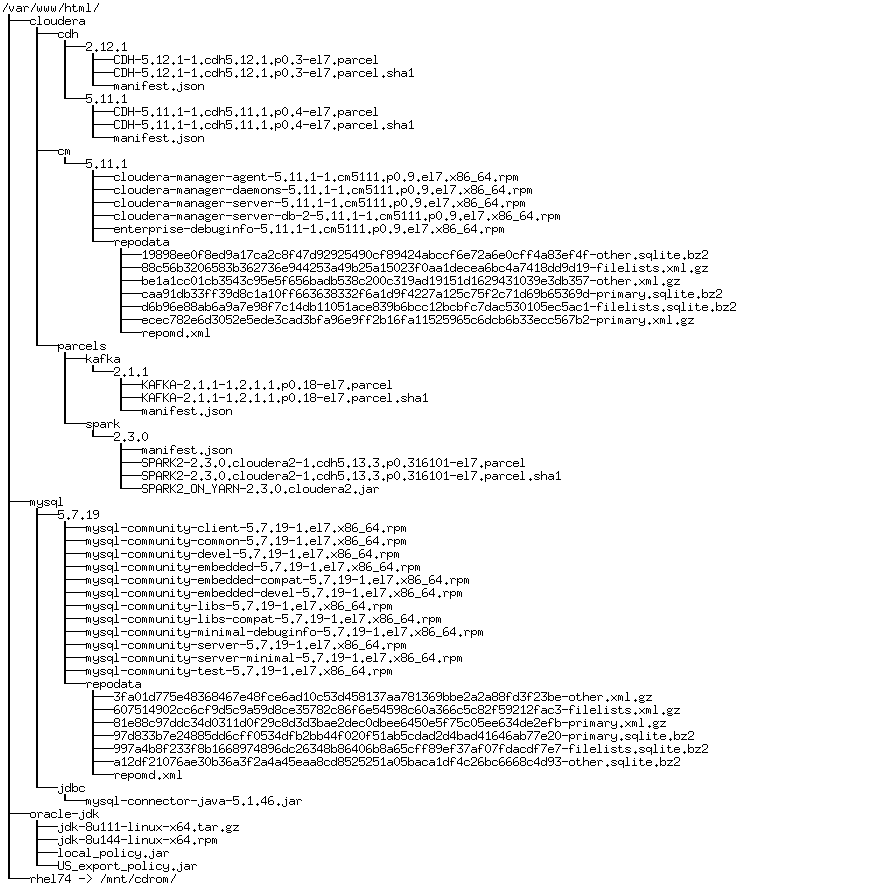
最终CM主机/var/www/html路径下的目录结构为下图:
4. 打通CM主机到其余主机的SSH免密钥登录
cd  ~ ;\
bash -c 'cat > ./HitthroughSSH.sh <<EOF
#!/bin/bash
##
#===========================================================
echo "script usage : ./HitthroughSSH.sh hosts.txt"
echo "hosts.txt format: host_ip:root_password"
#=========================================================
echo "==Setup1:Check if cmd expect exist,if no,install automatically"
rpm -qa | grep expect
if [ \$? -ne 0 ];then
yum install -y expect
fi
#=====================================
echo "==Setup2:Check if have been generated ssh private and public key.if no ,generate automatically "
if [ ! -f ~/.ssh/id_rsa ];then
  ssh-keygen -t rsa -P "" -f ~/.ssh/id_rsa
fi
#===========================================================
echo "Setup3:Read IP and root password from text"
echo "Setup4:Begin to hit root ssh login without password thorough hosts what defined in the hosts.txt"
for p in \$(cat \$1)
do
    ip=\$(echo "\$p"|cut -f1 -d":")
    password=\$(echo "\$p"|cut -f2 -d":")
    expect -c "
            spawn ssh-copy-id -i /root/.ssh/id_rsa.pub root@\$ip
            expect {
                \"*yes/no*\" {send \"yes\r\"; exp_continue}
                \"*password*\" {send \"\$password\r\"; exp_continue}
                \"*Password*\" {send \"\$password\r\";}
            }
        "
    ssh root@\$ip "date"
done
EOF' ;\
  sed -i -c -e '/^$/d;/^##/d' ./HitthroughSSH.sh ;\
  chmod +x ./HitthroughSSH.sh ;\
  bash -c 'cat > ./hosts.txt <<EOF
cm.cloudera.curiouser.com:1234
master1.cloudera.curiouser.com:1234
master2.cloudera.curiouser.com:1234
node1.cloudera.curiouser.com:1234
node2.cloudera.curiouser.com:1234
node3.cloudera.curiouser.com:1234
EOF' ;\
  ./HitthroughSSH.sh ./hosts.txt ;\
  rm -rf ./HitthroughSSH.sh ./hosts.txt
5. 将CM主机上的YUM源同步到其他主机上
for i in {cm,master1,master2,node1,node2,node3} ;do scp /etc/yum.repos.d/rhel74.repo $i.cloudera.curiouser.com:/etc/yum.repos.d/ ;done
6. 配置集群内的NTP时间同步
将CM主机作为NTP服务端
yum install ntp -y ;\
rm -rf /etc/ntp.conf ;\
bash -c 'cat > /etc/ntp.conf << EOF
driftfile /var/lib/ntp/drift
restrict default kod nomodify notrap nopeer noquery
restrict -6 default kod nomodify notrap nopeer noquery
restrict 127.0.0.1
restrict -6 ::1
restrict 172.16.7.0 mask 255.255.255.0 nomodify #指定允许的客户端
server 127.127.1.0
fudge 127.127.1.0 stratum 10
includefile /etc/ntp/crypto/pw
keys /etc/ntp/keys
EOF' ;\
    sed -i -c -e '/^$/d;/^##/d' /etc/ntp.conf ;\
    systemctl enable ntpd ;\
    systemctl start ntpd ;\
    systemctl status ntpd ;\
    ntpstat
其他主机为NTP客户端
yum install -y ntp ;\
rm -rf /etc/ntp.conf ;\
bash -c 'cat > /etc/ntp.conf << EOF
driftfile /var/lib/ntp/drift
restrict default kod nomodify notrap nopeer noquery
restrict -6 default kod nomodify notrap nopeer noquery
restrict 127.0.0.1
restrict -6 ::1
##NTP服务端IP
server cm.cloudera.curiouser.com
includefile /etc/ntp/crypto/pw
keys /etc/ntp/keys
EOF' ;\
  sed -i -c -e '/^$/d;/^##/d' /etc/ntp.conf ;\
  systemctl enable ntpd ;\
  systemctl start ntpd ;\
  ntpstat
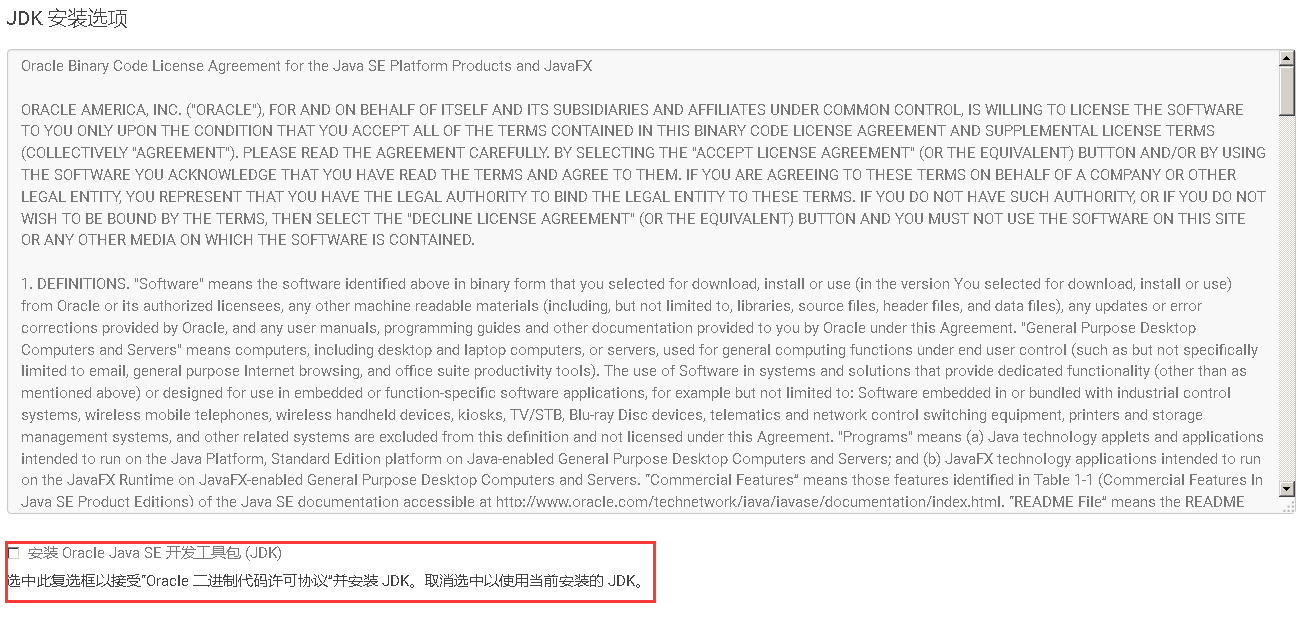
7. 所有主机安装Oracle JDK并替换JCE
yum localinstall -y http://cm.cloudera.curiouser.com/oracle-jdk/jdk-8u144-linux-x64.rpm ;\
yum install -y wget  ;\
rm -rf /usr/java/jdk1.8.0_144/jre/lib/security/{local_policy.jar,US_export_policy.jar} ;\
wget http://cm.cloudera.curiouser.com/oracle-jdk/{local_policy.jar,US_export_policy.jar} -P /usr/java/jdk1.8.0_144/jre/lib/security/
8. 所有主机挂载额外硬盘到/data目录
disk=sdb &&\
yum install -y lvm2 &&\
pvcreate /dev/${disk} &&\
vgcreate -s 4M data /dev/${disk} &&\
PE_Number=`vgdisplay data|grep "Free  PE"|awk '{print $5}'` &&\
lvcreate -l ${PE_Number} -n data data &&\
mkfs.xfs /dev/data/data &&\
echo "/dev/data/data /data xfs defaults 0 0" >> /etc/fstab &&\
mkdir /data &&\
mount -a &&\
df -mh
9、CM节点安装MySQL,并添加MySQL 的JDBC包
安装MySQL
yum install -y mysql-community-server &&\
rm -rf /etc/my.cnf ;\
bash -c 'cat > /etc/my.cnf <<EOF
[mysqld]
datadir=/data/mysql/data
socket=/data/mysql/data/mysql.sock
symbolic-links=0
log-error=/data/mysql/logs/mysqld.log
pid-file=/data/mysql/data/mysqld.pid
lower_case_table_names=0
federated
init_connect="SET NAMES utf8"
character_set_server=utf8
[mysql]
socket=/data/mysql/data/mysql.sock
default-character-set=utf8
[client]
default-character-set=utf8
EOF' &&\
mkdir -p /data/mysql/{logs,data} &&\
chown -R mysql:mysql /data/mysql  &&\
mysqld --initialize --user=mysql &&\
systemctl enable mysqld &&\
systemctl daemon-reload &&\
systemctl start mysqld &&\
systemctl status mysqld
修改MySQL用户root的默认密码
mysql -uroot -p`awk '{ if(match($0,"root@localhost: ")) {print substr($0,RSTART+RLENGTH) }}' /data/mysql/logs/mysqld.log` -e "ALTER USER 'root'@'localhost' IDENTIFIED BY 'Test@123';"
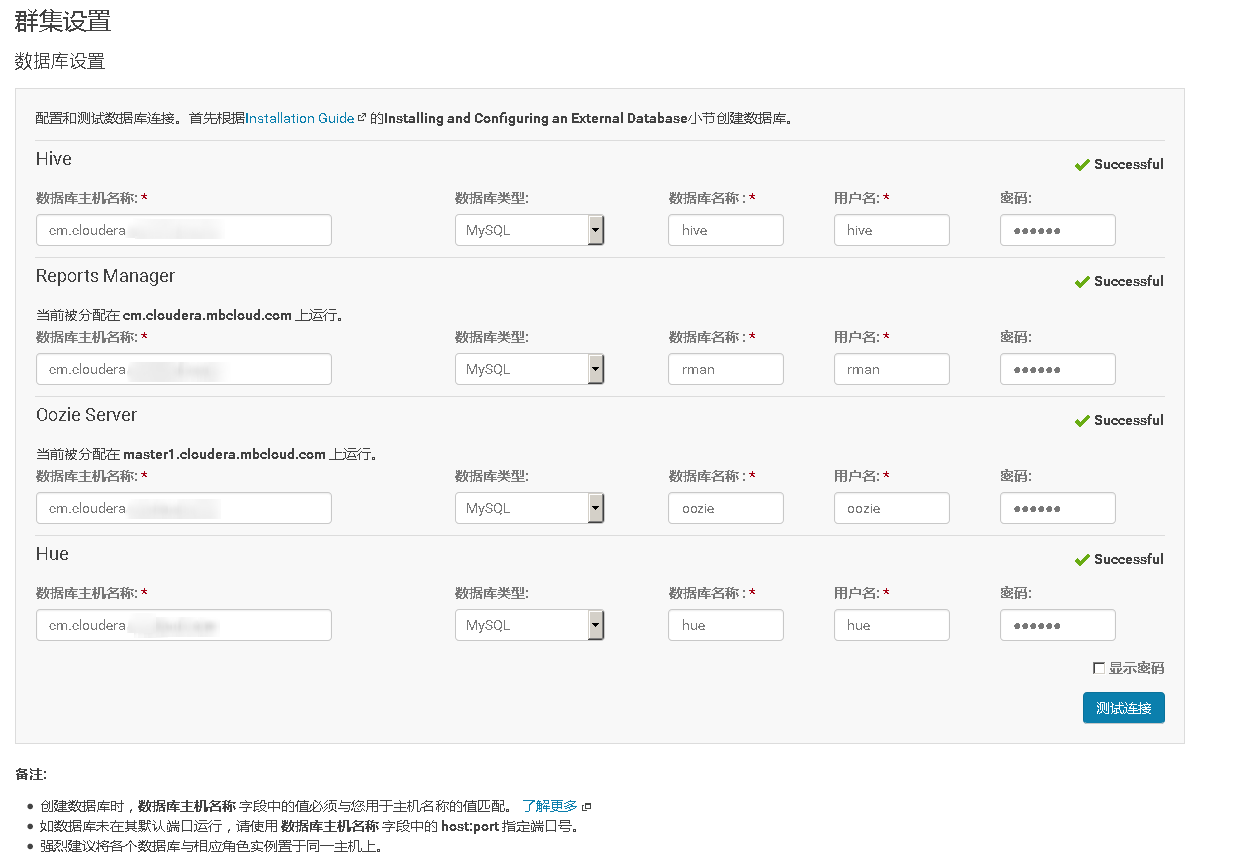
创建相关Database
mysql -uroot -p`awk '{ if(match($0,"root@localhost: ")) {print substr($0,RSTART+RLENGTH) }}' /data/mysql/logs/mysqld.log` \
-e "create database scm default character set utf8;" \
-e "create database rman default character set utf8;" \
-e "create database metastore default character set utf8;" \
-e "create database oozie default character set utf8;" \
-e "create database hue default character set utf8;" \
-e "create database sentry default character set utf8;" \
-e "create database hive default character set utf8;" \
-e "grant all privileges on scm.* to 'scm'@'%' identified by '123456';" \
-e "grant all privileges on rman.* to 'rman'@'%' identified by '123456';" \
-e "grant all privileges on metastore.* to 'metastore'@'%' identified by '123456';" \
-e "grant all privileges on oozie.* to 'oozie'@'%' identified by '123456';" \
-e "grant all privileges on hue.* to 'hue'@'%' identified by '123456';" \
-e "grant all privileges on sentry.* to 'sentry'@'%' identified by '123456';" \
-e "grant all privileges on hive.* to 'hive'@'%' identified by '123456';" \
-e "flush privileges;"
将MySQL的JDBC包分发到所有主机上
mkdir /usr/share/java ;\
wget http://cm.cloudera.curiouser.com/mysql/jdbc/mysql-connector-java-5.1.46.jar  -P /usr/share/java/ ;
ln -s /usr/share/java/mysql-connector-java-5.1.46.jar /usr/share/java/mysql-connector-java.jar
三、CM节点安装Cloudera Manager
1、安装服务
yum install -y cloudera-manager-daemons cloudera-manager-server
2、配置 Cloudera Manager 能够连接 Mysql 外部数据库
/usr/share/cmf/schema/scm_prepare_database.sh -h cm.cloudera.curiouser.com mysql scm scm 123456
3、启动服务
systemctl enable cloudera-scm-server &&\
systemctl start cloudera-scm-server &&\
systemctl status cloudera-scm-server
服务启动日志:/var/log/cloudera-scm-server/cloudera-scm-server.log
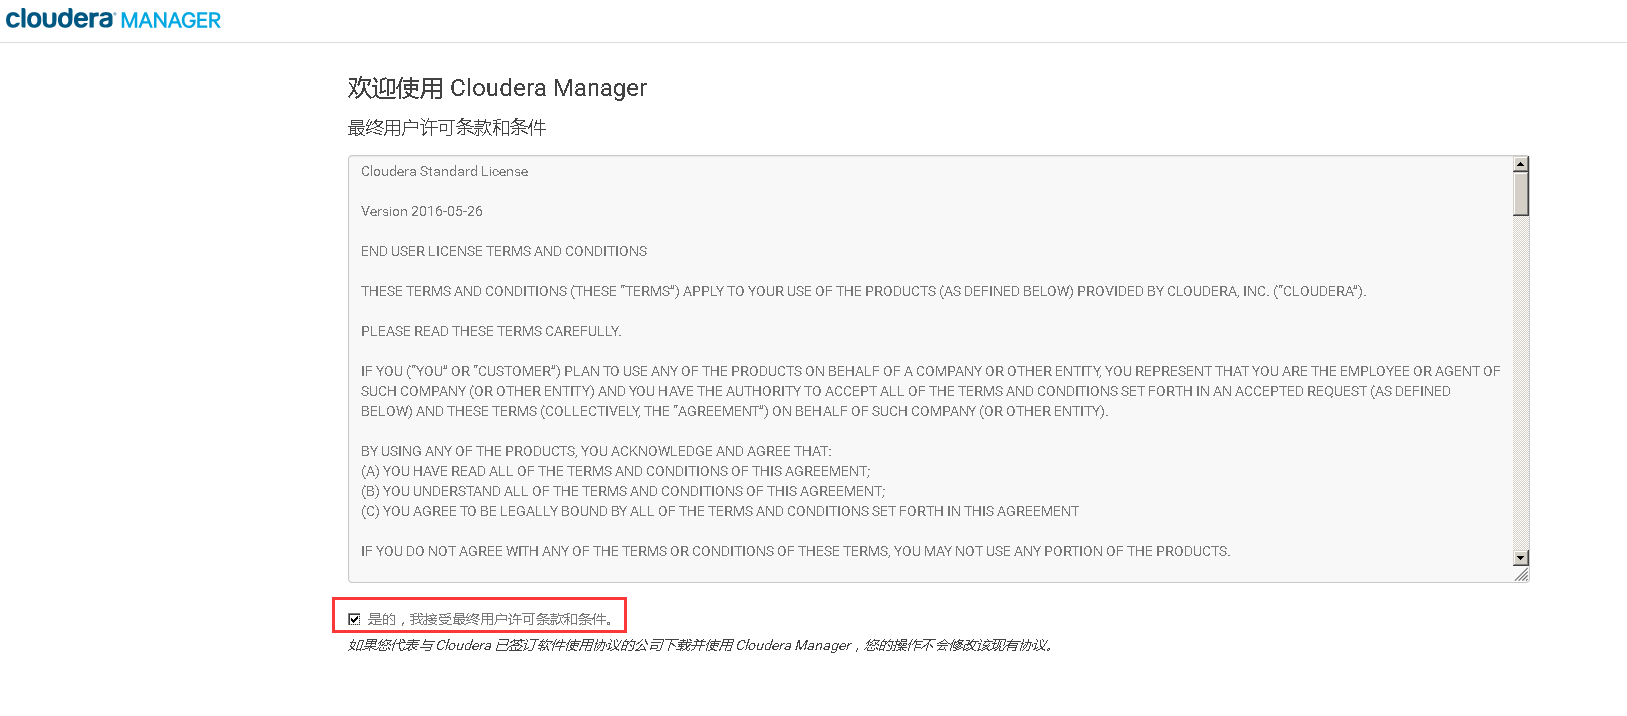
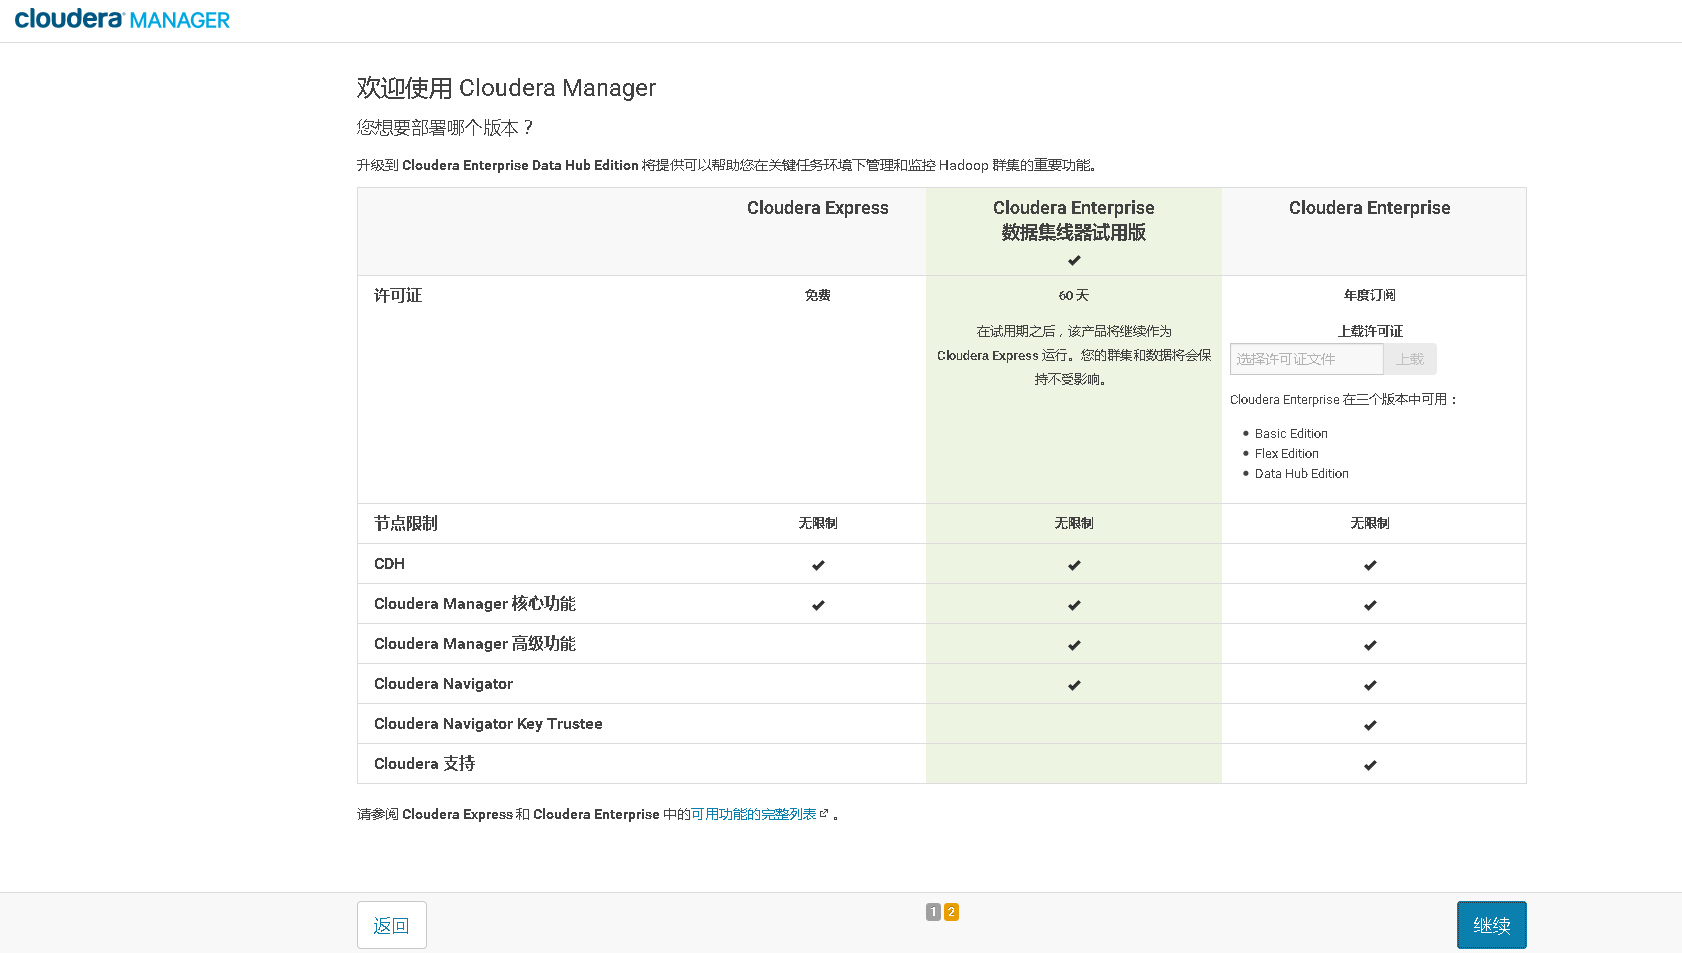
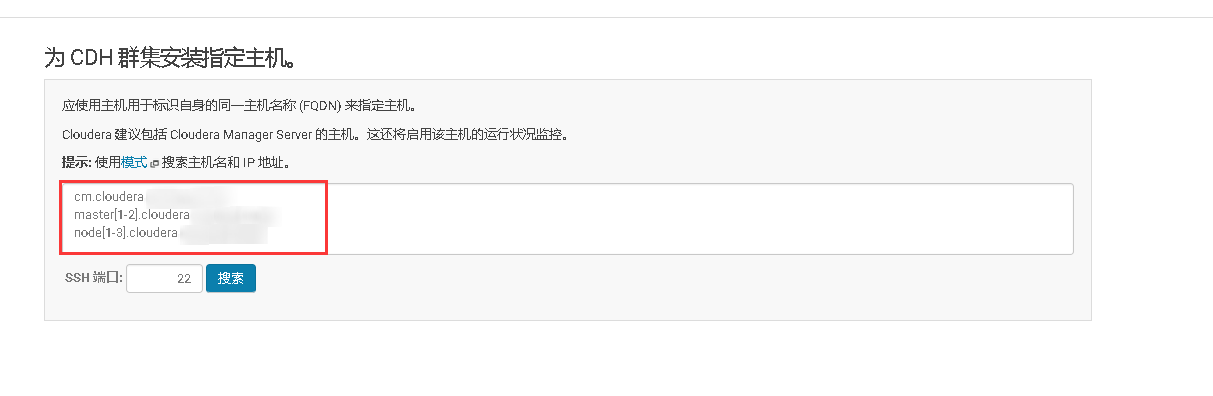
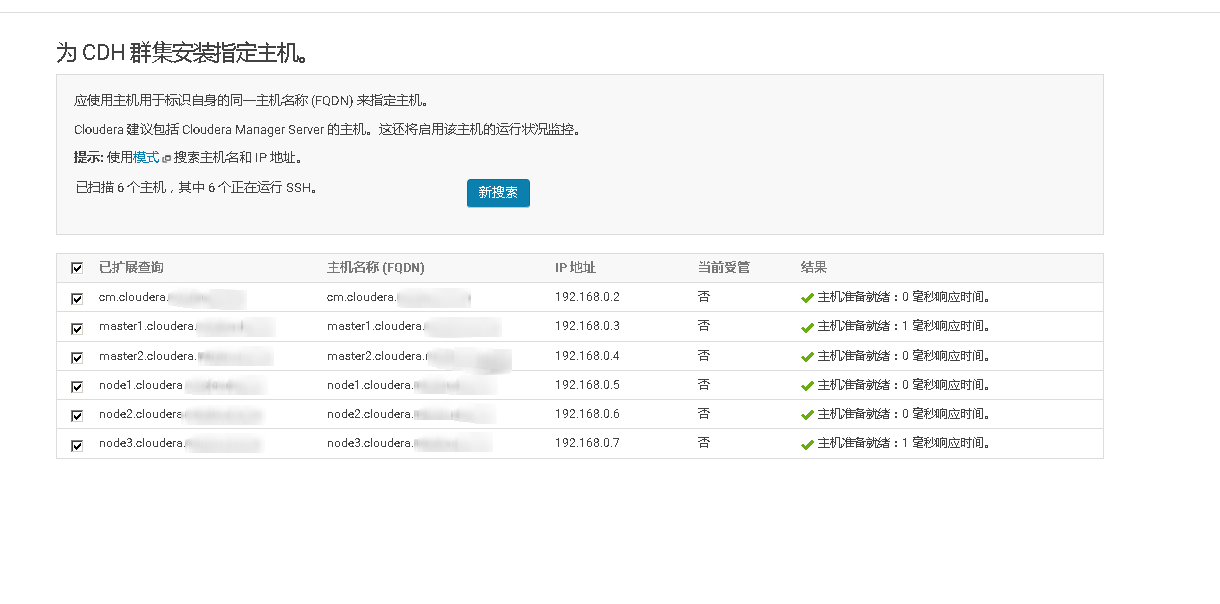
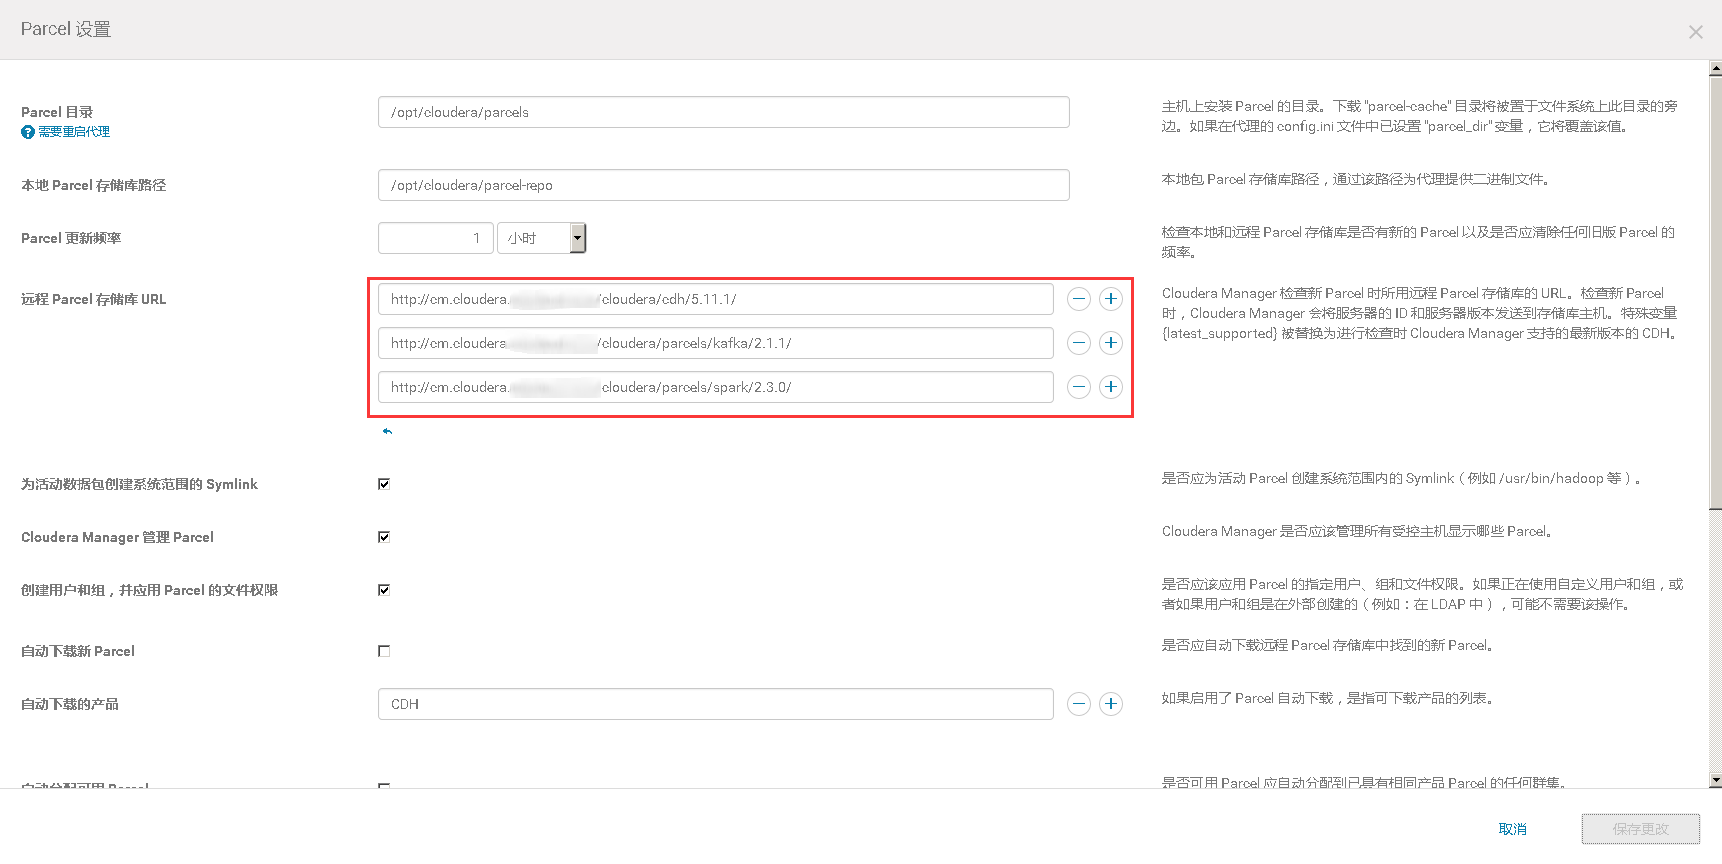
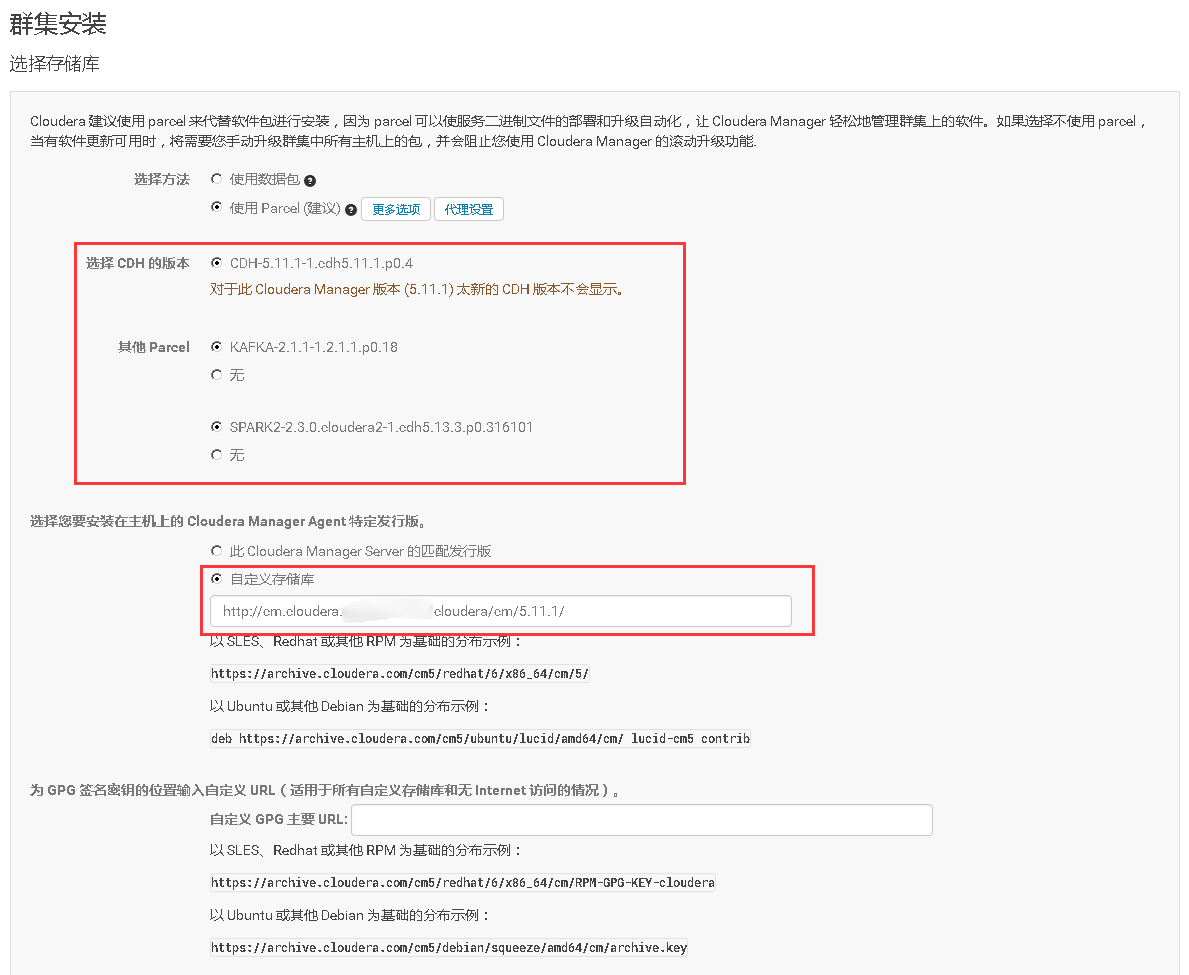
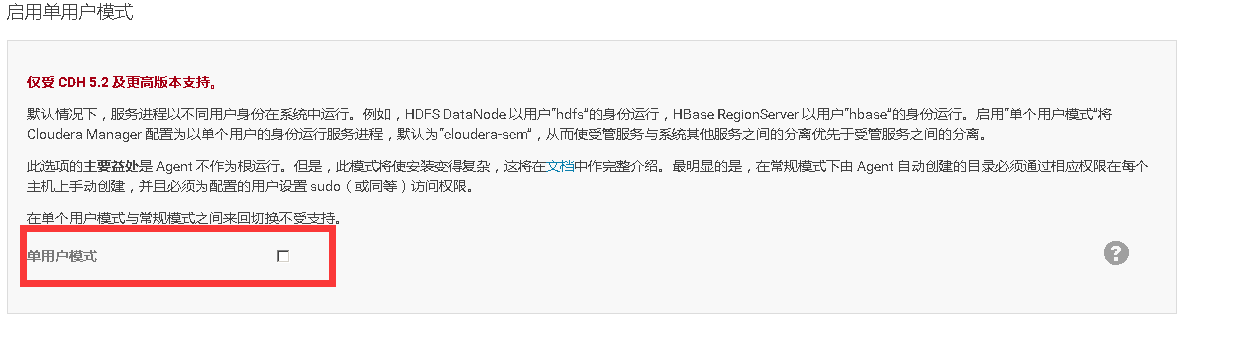
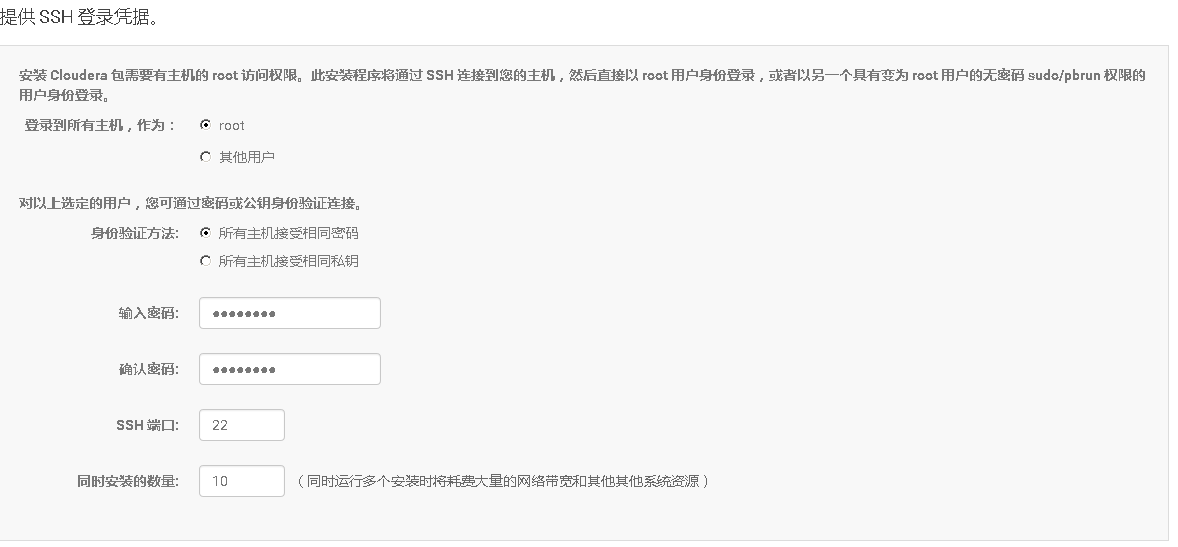
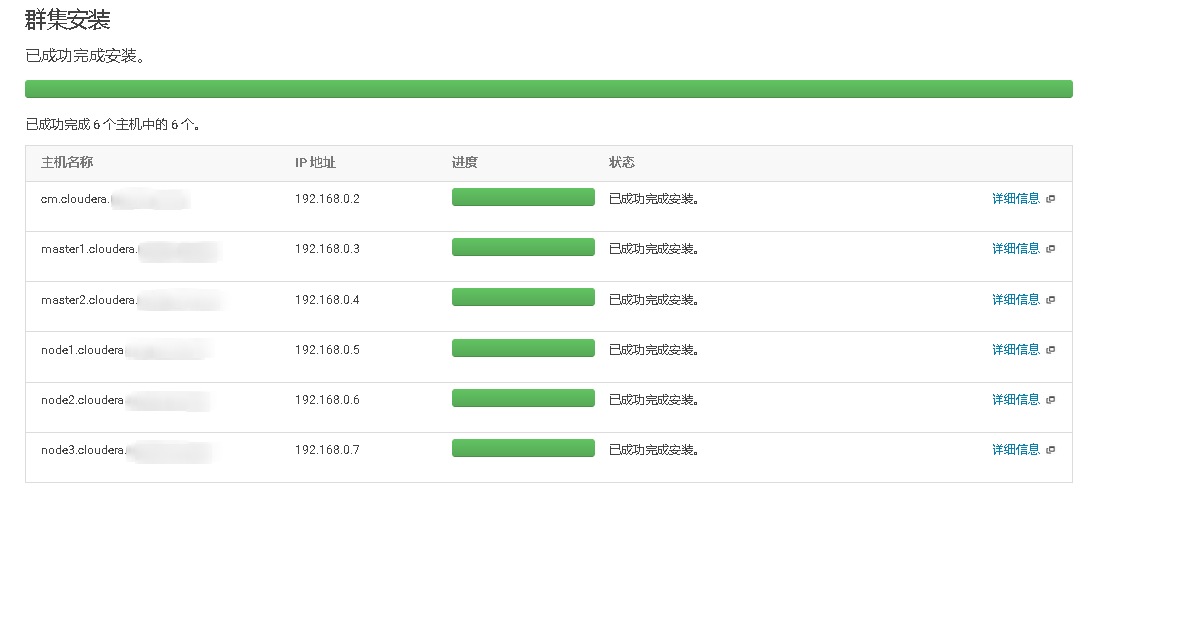
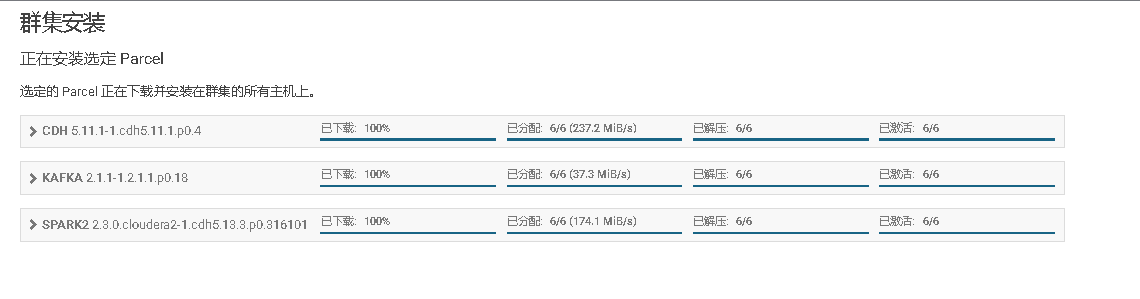
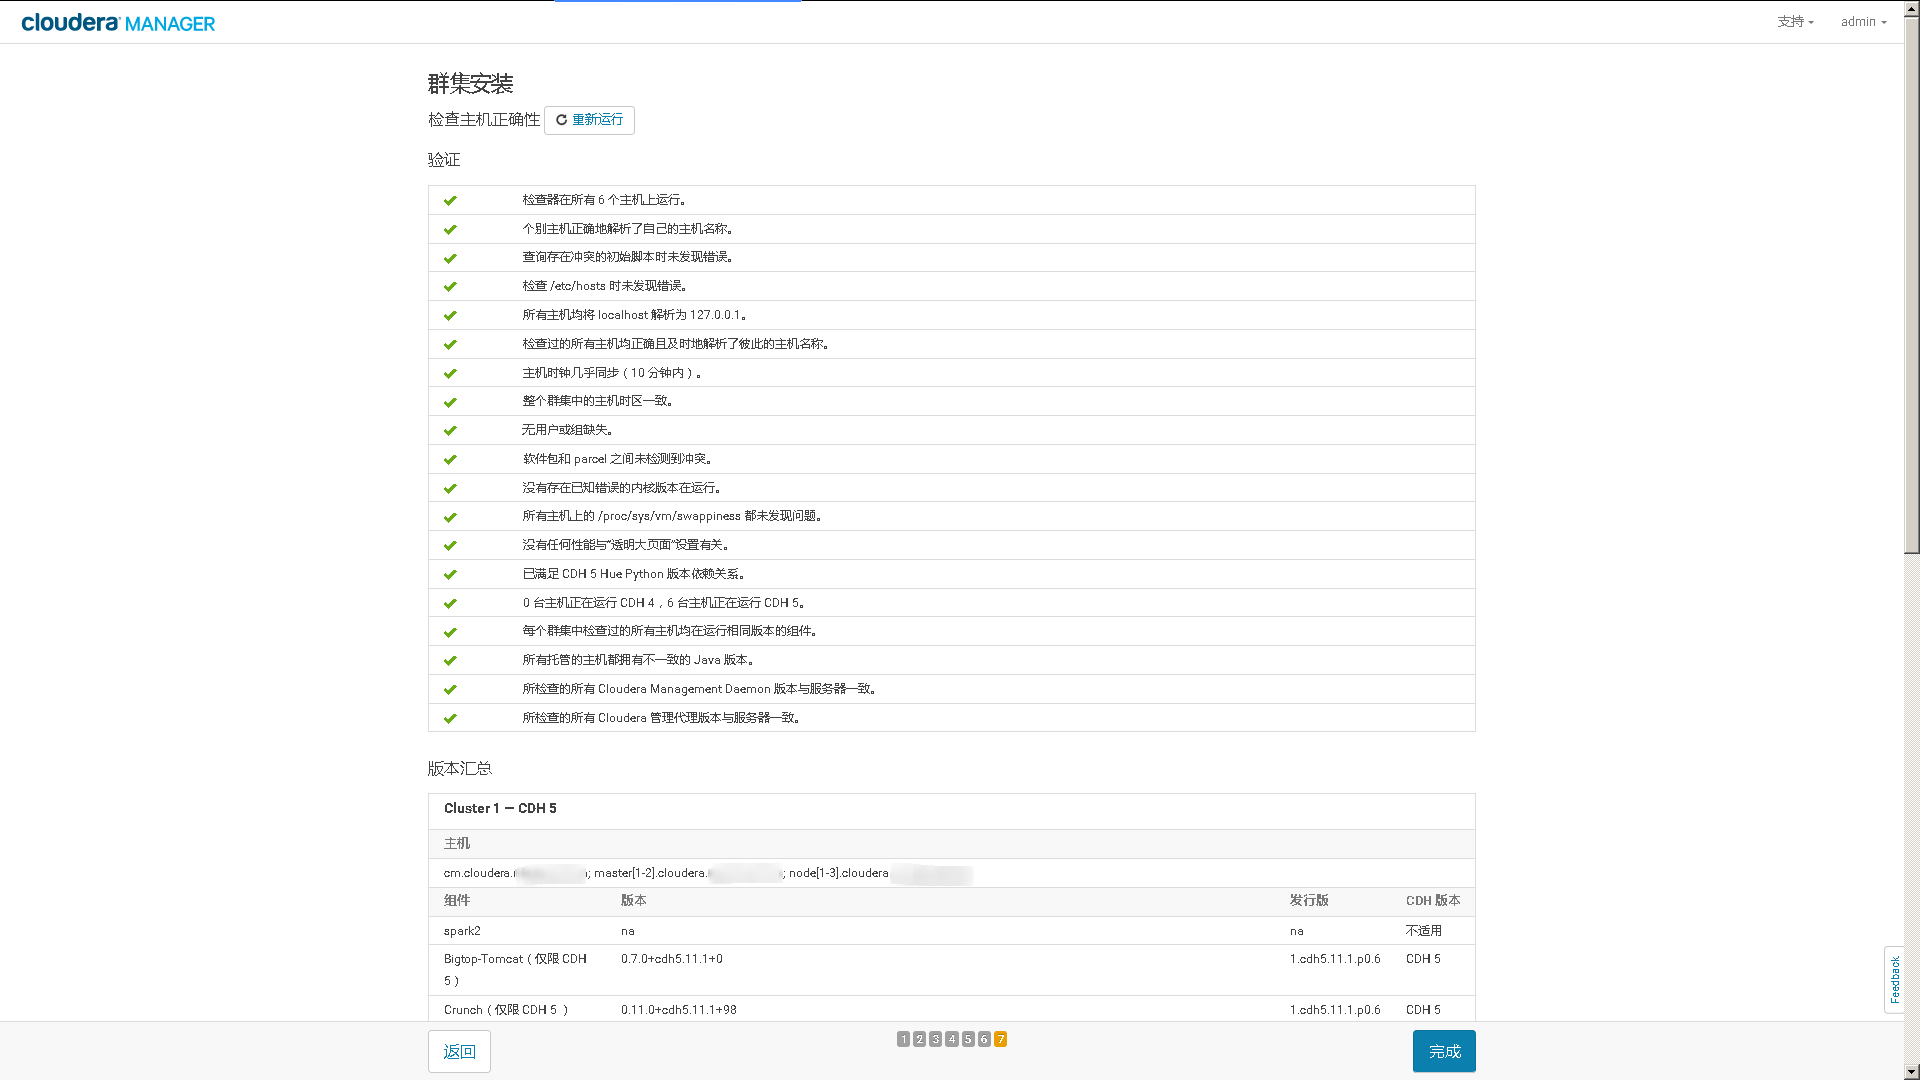
四、在ClouderaManager的Web UI界面上安装Cloudera Agent和CDH

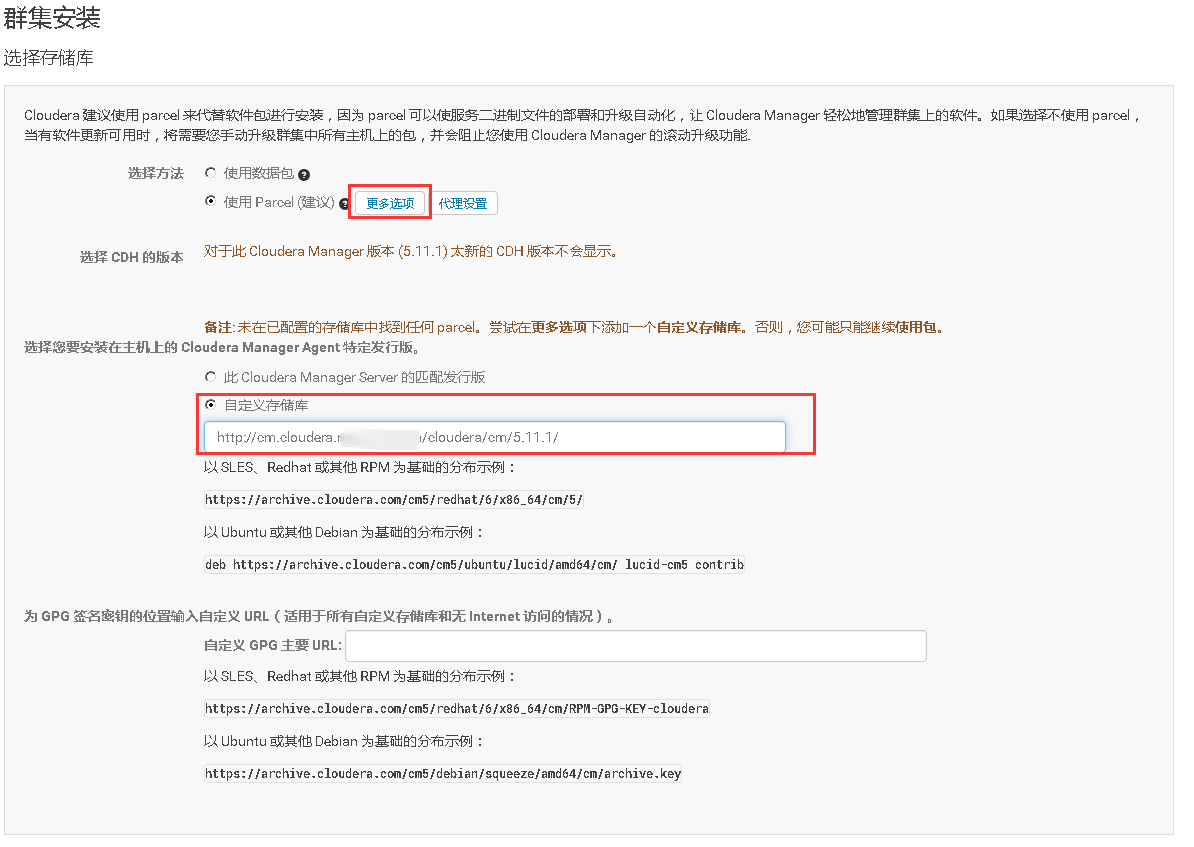 http://cm.cloudera.curiouser.com/cloudera/cm/5.11.1/
http://cm.cloudera.curiouser.com/cloudera/cdh/5.11.1/
http://cm.cloudera.curiouser.com/cloudera/parcels/kafka/2.1.1/
http://cm.cloudera.curiouser.com/cloudera/parcels/spark/2.3.0/
http://cm.cloudera.curiouser.com/cloudera/cm/5.11.1/
http://cm.cloudera.curiouser.com/cloudera/cdh/5.11.1/
http://cm.cloudera.curiouser.com/cloudera/parcels/kafka/2.1.1/
http://cm.cloudera.curiouser.com/cloudera/parcels/spark/2.3.0/
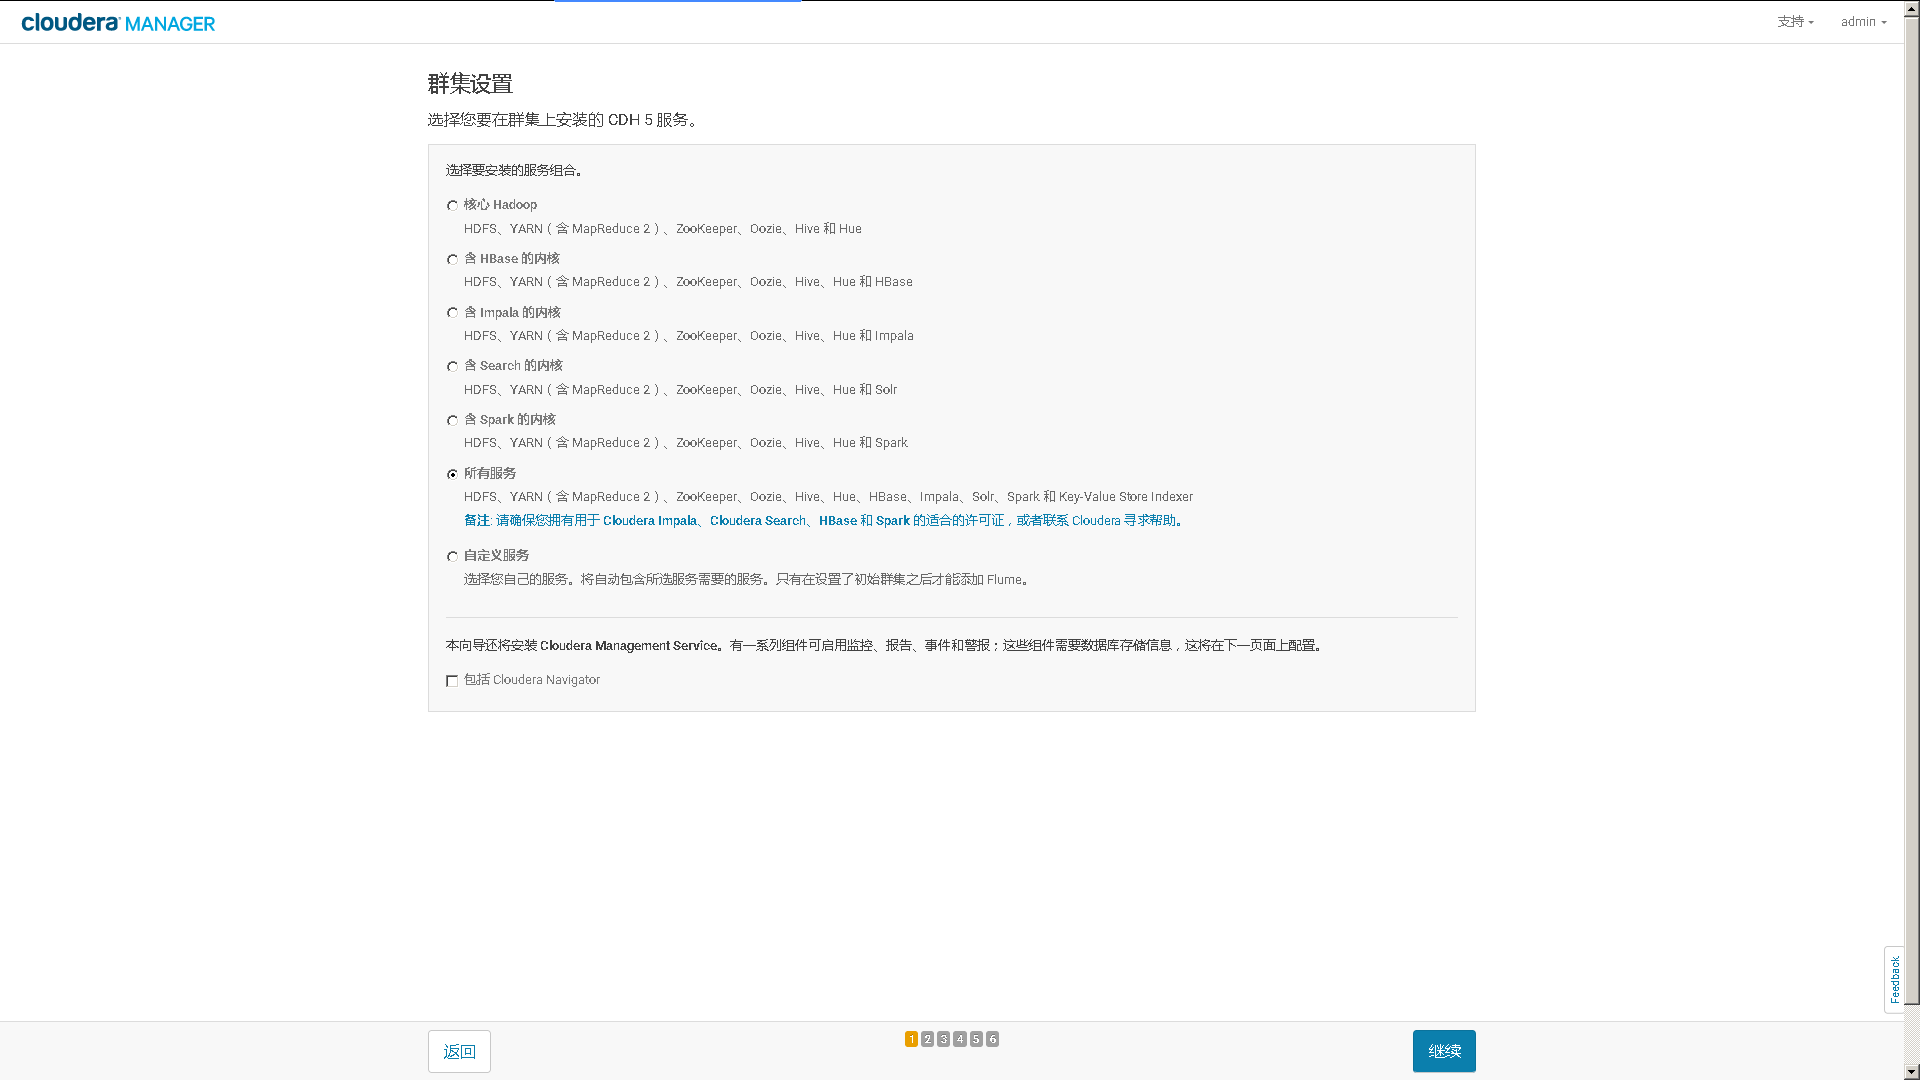
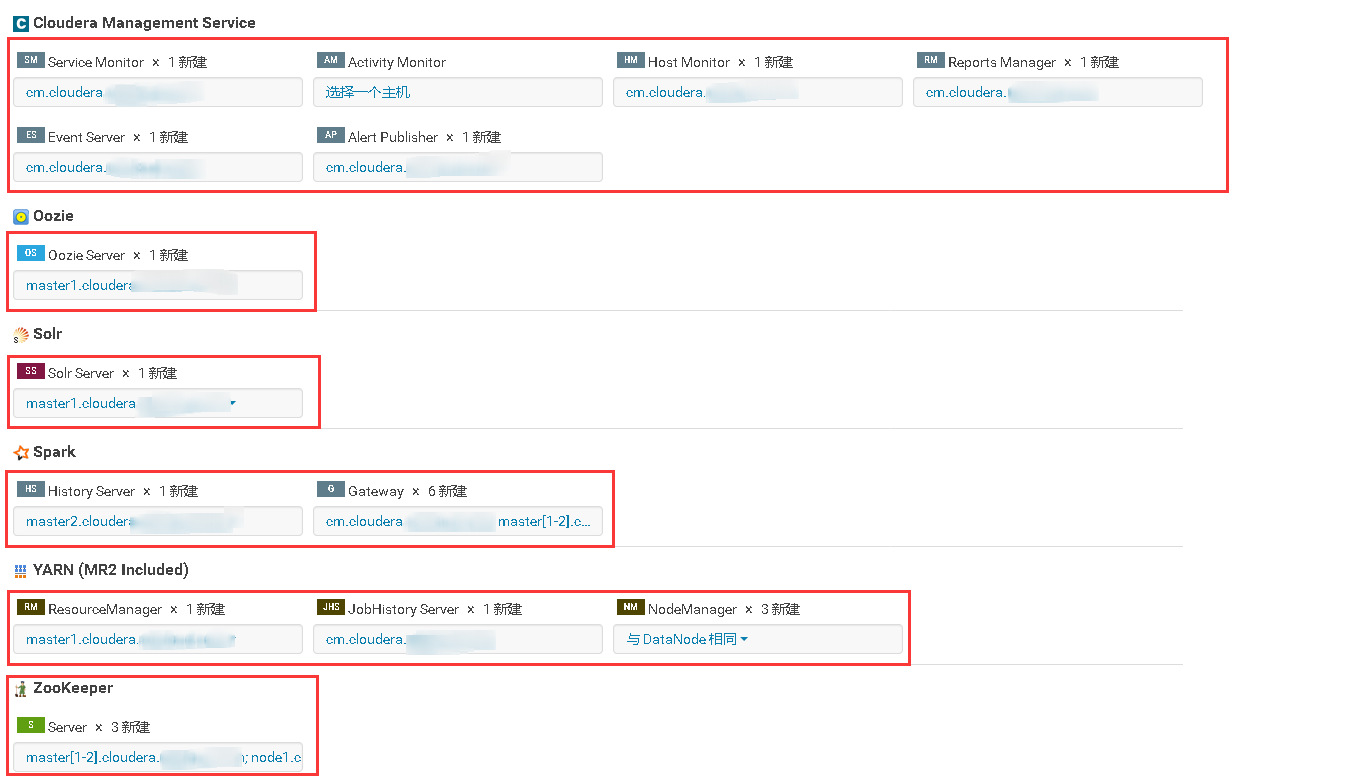
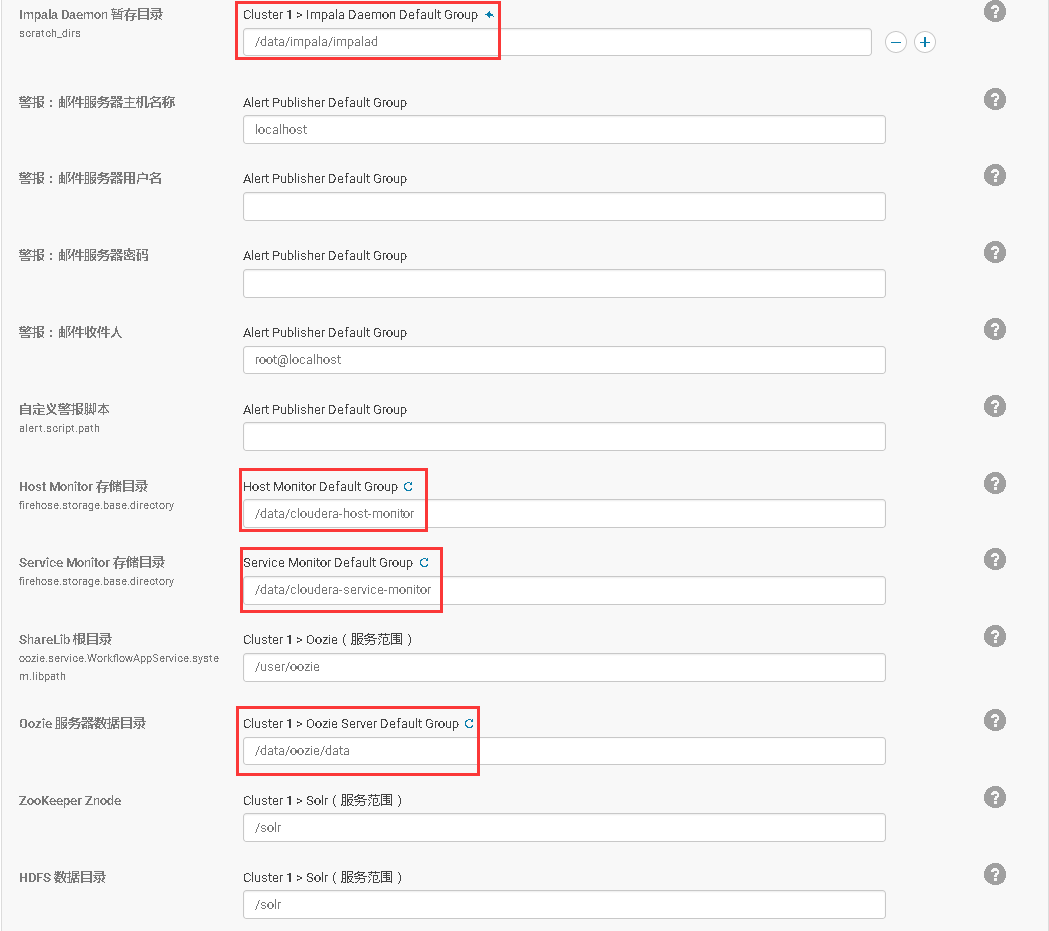
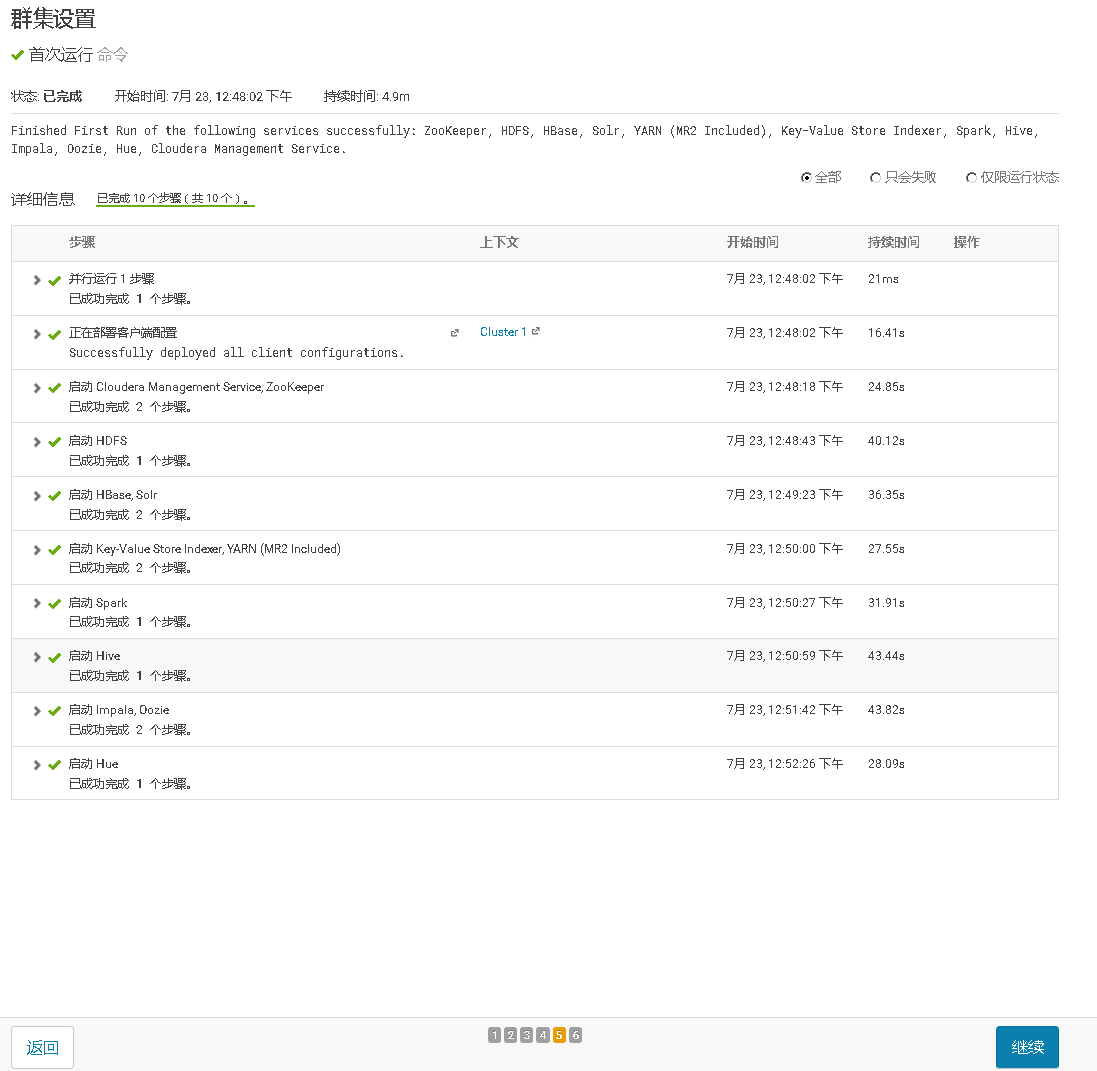
五、CDH内服务的集群配置
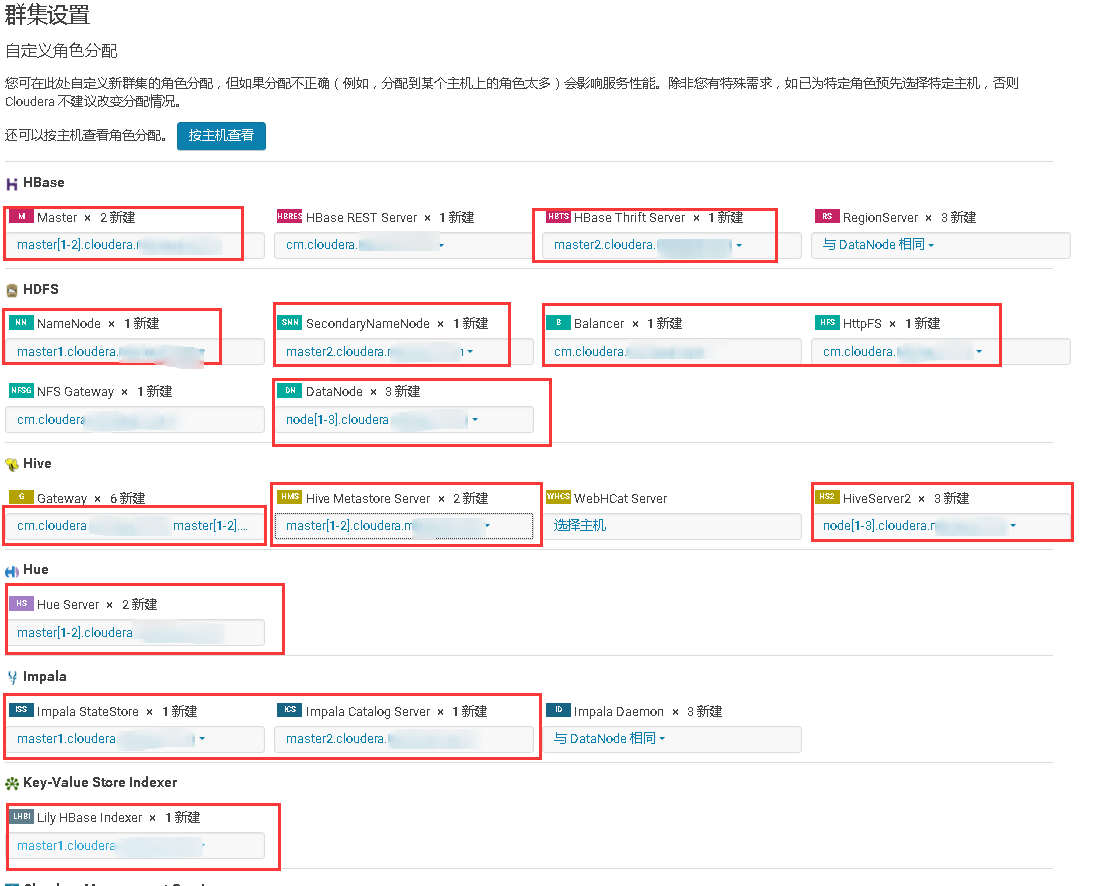
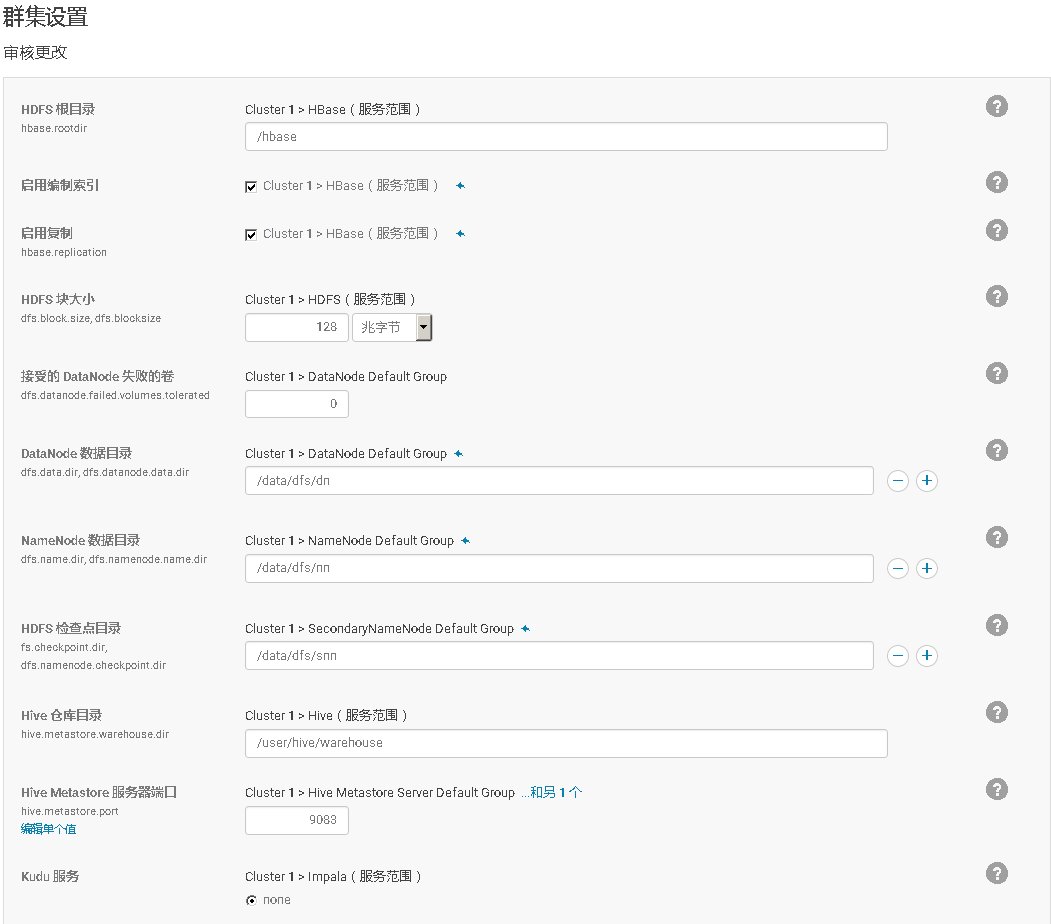
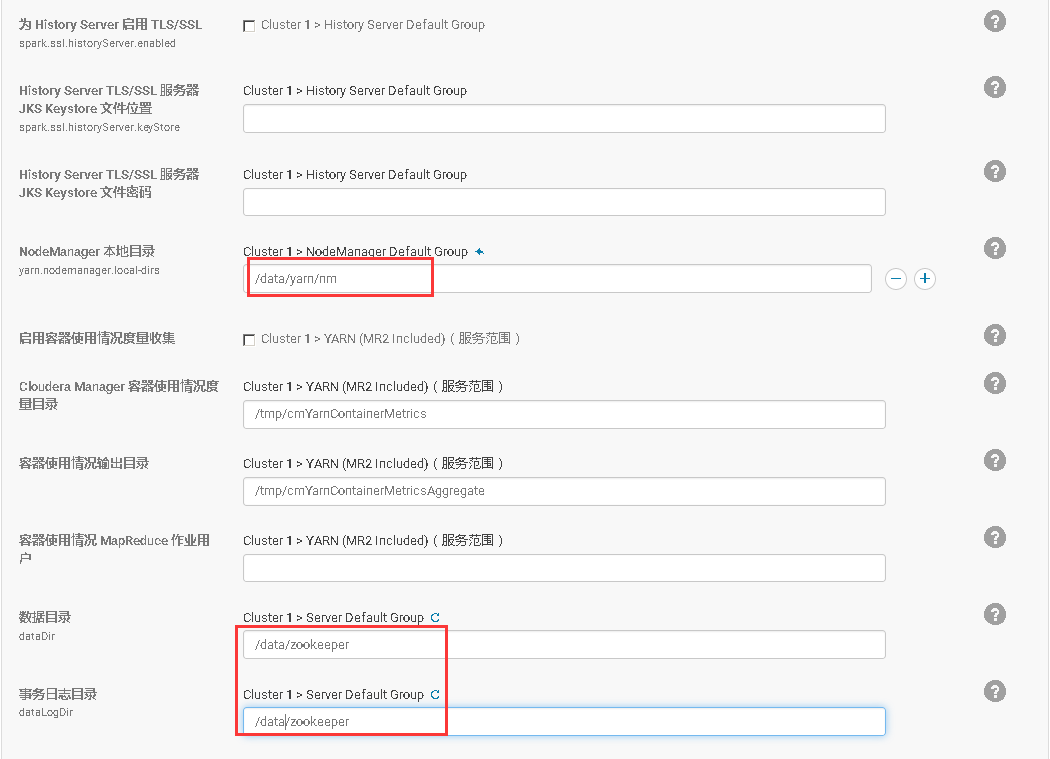 修改过zookeeper的默认数据存储目录后,安装Zookeeper的时候会提示无法自动创建目录,所以在Zookeeper服务实例主机上手动创建该目录。
mkdir -p /data/zookeeper/version-2;\
chown -R zookeeper:zookeeper /data/zookeeper
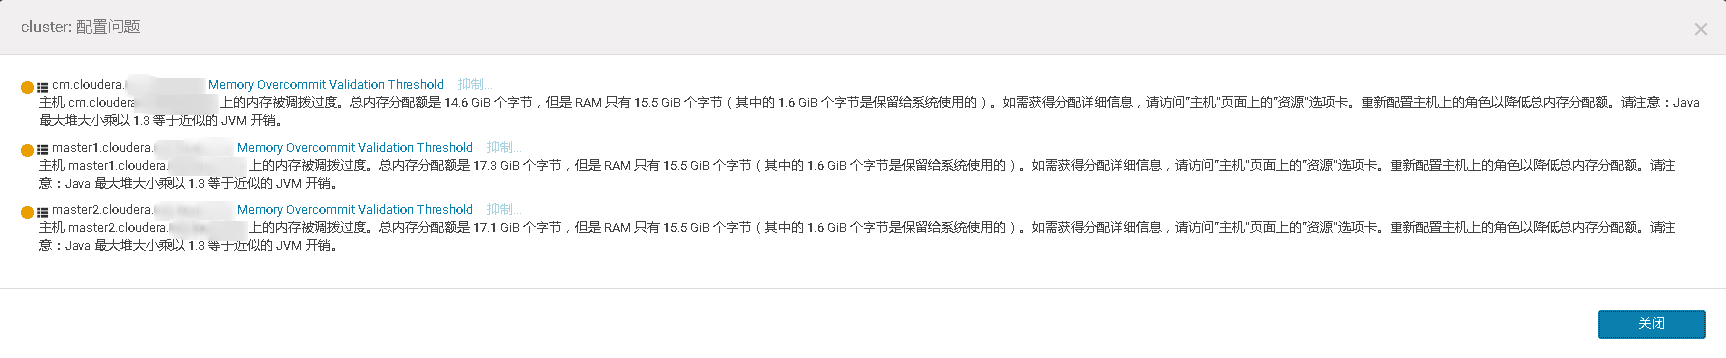
六、集群配置优化
刚创建完的集群会提示你例如HDFS服务NameNode节点的Java堆栈大小根据服务实例主机的具体硬件配置提示设置得不合理。所以需要再次优化配置。
根据Cloudera Manage上的提示修改配置然后重启即可。
 备注:集群中黄色警告配置是主机上分配的角色,占用的内存超出了主机的物理内存