GitBook简介安装配置
一、GitBook简介
- gitbook 是一个基于node.js的命令行工具
- gitbook 支持markdown/asciiDoc语法格式构建书籍
- gitbook 支持输出静态网页(可定制和可扩展)和电子书(PDF,ePub或Mobi)等多种格式,其中默认输出静态网页格式
- gitbook 不仅支持本地构建书籍,还可以托管在gitbook 官网上,或者Github上
二、GitBook安装
1、安装NodeJs环境
NodeJs官网下载链接:https://nodejs.org/en/download/
Linux
以安装NodeJs 10.16.3为例
wget https://nodejs.org/dist/v10.16.3/node-v10.16.3-linux-x64.tar.xz && \
tar -xvf node-v10.16.3-linux-x64.tar.xz -C /opt/ && \
rm -rf node-v10.16.3-linux-x64.tar.xz && \
ln -s /opt/node-v10.16.3-linux-x64 /opt/nodejs && \
sed -i '$a export NODEJS_HOME=/opt/nodejs\nexport PATH=$PATH:$NODEJS_HOME/bin' /etc/profile && \
source /etc/profile && \
yum install gcc-c++ make -y && \
npm config set registry https://registry.npm.taobao.org && \
npm config set sass_binary_site https://npm.taobao.org/mirrors/node-sass/ && \
node -v && \
npm version
Windows
直接在官网下载MSI格式的安装包进行安装
2、安装Gitbook CLI命令行工具
gitbook-cli 是 gitbook 的一个命令行工具, 通过它可以在电脑上安装和管理多个版本的gitbook.
npm install gitbook-cli -g
# 不可以直接使用npm安装gitbook
三、GitBook版本的管理
gitbook-cli 和 gitbook 是两个软件,gitbook-cli 会将下载的 gitbook 的不同版本放到 ~/.gitbook中, 可以通过设置GITBOOK_DIR环境变量来指定另外的文件夹
GitBook可以在本地安装多个版本并在执行命令的时候指定某个版本,如果指定的版本还没安装就会自动下载安装,下载后的GitBook会被放到~/.gitbook目录下。
$ gitbook --help
  Usage: gitbook [options] [command]
  Options:
    -v, --gitbook [version]  specify GitBook version to use
    -d, --debug              enable verbose error
    -V, --version            Display running versions of gitbook and gitbook-cli
    -h, --help               output usage information
  Commands:
    ls                        List versions installed locally
    current                   Display currently activated version
    ls-remote                 List remote versions available for install
    fetch [version]           Download and install a <version>
    alias [folder] [version]  Set an alias named <version> pointing to <folder>
    uninstall [version]       Uninstall a version
    update [tag]              Update to the latest version of GitBook
    help                      List commands for GitBook
    *                         run a command with a specific gitbook version

# 查看当前GitBook CLI版本
gitbook -V

# 列出本地安装版本
gitbook ls

# 列出当前使用版本
gitbook current

# 列出远程可用版本
gitbook ls-remote

# 安装指定版本(如果安装比较慢的话,将npm镜像源切到国内的CNPM镜像源。可使用NRM管理NPM的镜像源)
gitbook fetch [version]

# 卸载指定版本
gitbook uninstall [version]

# 更新指定版本
gitbook update [tag]
使用gitbook安装gitbook-cli时出现gitbook-cli/node_modules/npm/node_modules/graceful-fs/polyfills.js:287 cb.apply is not a function报错时,是因为最新NodeJS的graceful-fs模块与gitbook-cli不兼容导致的,只需将graceful-fs的版本降到4.2.0即可。
cd /usr/local/lib/node_modules/gitbook-cli/node_modules/npm/node_modules/
npm install graceful-fs@4.2.0 --save

# 或者
直接替换/usr/local/lib/node_modules/gitbook-cli/node_modules/npm/node_modules/graceful-fs/polyfills.js的内容为https://raw.githubusercontent.com/isaacs/node-graceful-fs/168bdb8f0bb3174e8499d4bc5878deead4172c39/polyfills.js里的
四、GitBook CLI命令
1、gitbook 可用命令
$ gitbook help

build [book] [output]       构建书籍
    --log                   指定日志输出级别(值为debug, info默认, warn, error, disabled)
    --format                Format to build to (Default is website; Values are website, json, ebook)
    --[no-]timing           Print timing debug information (Default is false)
serve [book] [output]       serve the book as a website for testing
    --port                  指定监听端口(默认端口4000)
    --lrport                Port for livereload server to listen on (Default is 35729)
    --[no-]watch            Enable file watcher and live reloading (Default is true)
    --[no-]live             Enable live reloading (Default is true)
    --log                   指定日志输出级别(值为debug, info默认, warn, error, disabled)
    --format                Format to build to (Default is website; Values are website, json, ebook)
install [book]              安装所有插件资源
    --log                   指定日志输出级别(值为debug, info默认, warn, error, disabled)
parse [book]                parse and print debug information about a book
    --log                   指定日志输出级别(值为debug, info默认, warn, error, disabled)
init [book]                 初始化创建书籍文件结构
    --log                   指定日志输出级别(值为debug, info默认, warn, error, disabled)
pdf [book] [output]         构建书籍为ebook文件
    --log                   指定日志输出级别(值为debug, info默认, warn, error, disabled)
epub [book] [output]        构建书籍为ebook文件
    --log                   指定日志输出级别(值为debug, info默认, warn, error, disabled)
mobi [book] [output]        构建书籍为ebook文件
    --log                   指定日志输出级别(值为debug, info默认, warn, error, disabled)
2、gitbook init初始化创建书籍文件结构
gitbook init
# 在当前路径下自动生成README.md 和 SUMMARY.md。也可以先手动创建SUMMARY.md,再执行gitbook init,如果SUMMARY.md中配置的文件夹和文件不存在,就会自动创建文件夹和文件,已经存在的文件夹和文件不会被覆盖。

gitbook init ./directory
# 可将书籍初始化到指定目录
3、gitbook build构建gitbook书籍静态HTML资源
gitbook build [book] [output]
# 会在书籍的文件夹中生成一个 _book 的文件夹, 里面有生成的静态HTML资源。可将 _book 文件夹下的文件拷贝到nginx、httpd等web服务器内
gitbook build --gitbook=2.0.1
# 指定Gitbook版本
4、gitbook serve启动本地预览书籍服务
gitbook serve [book] [output]
浏览器中打开: http://localhost:4000 预览GitBook书籍
5、输出书籍文件
Prerequisite:
ebook-convert:GitBook在生成PDF的过程中使用到calibre的转换功能,没有安装Calibre或安装了Calibre没有配置环境变量都会导致转换PDF失败。Calibre下载地址:https://calibre-ebook.com/download在 Typora 中安装 Pandoc 进行导出
# 输出书籍为PDF格式文件
gitbook pdf [book] [output]

# 输出书籍为epub格式文件
gitbook epub [book] [output]

# 输出书籍为mobi格式文件
gitbook mobi [book] [output]
6、gitbook install安装插件样式资源
gitbook install [book]
#会在当前路径下生成node_modules文件夹,里面为插件的样式资源
7、gitbook parse 解析电子书
gitbook parse [book]
五、GitBook的文件结构
| 文件/文件夹 | 描述 | 是否必须 |
|---|---|---|
| README.md | 书籍的简介 | 必须 |
| SUMMARY.md | 书籍的目录结构 | 可选 |
| book.json | GitBook的插件样式配置文件 | 可选 |
| GLOSSARY.md | 词汇、术语列表 | 可选 |
| _book文件夹 | GitBook输出的静态HTML文件 | |
| node_modules文件夹 | 插件的样式资源 |
六、SUMMARY.md编写规则
- SUMMARY.md 的格式是一个链接列表。链接的标题将作为章节的标题,链接的目标是该章节文件的路径
- 向父章节添加嵌套列表将创建子章节
- 每章都有一个专用页面(part#/README.md),并分为子章节。
- 目录中的章节可以使用锚点指向文件的特定部分。
- 目录可以分为以标题或水平线 ---- 分隔的部分
- Parts 只是章节组,没有专用页面,但根据主题,它将在导航中显示。
七、book.json编写规则
常规设置
| 变量 | 描述 |
|---|---|
| root | 包含所有图书文件的根文件夹的路径,除了 book.json |
| structure | 指定 Readme,Summary,Glossary 和 Languages 的名称(而不是使用默认名称,如README.md)。这些文件必须在项目的根目录下(或 root 属性指定的根目录)structure.readme:Readme 文件名(默认值是 README.md )structure.summary:Summary 文件名(默认值是 SUMMARY.md )structure.glossary:Glossary 文件名(默认值是 GLOSSARY.md )structure.languages:Languages 文件名(默认值是 LANGS.md ) |
| title | 您的书名,默认值是从 README 中提取出来的。在 GitBook.com 上,这个字段是预填的。 |
| description | 您的书籍的描述,默认值是从 README 中提取出来的。在 GitBook.com 上,这个字段是预填的。 |
| author | 作者名。在GitBook.com上,这个字段是预填的。 |
| isbn | 国际标准书号 ISBN |
| language | 本书的语言类型 —— ISO code 。默认值是 en |
| direction | 文本阅读顺序。可以是 rtl (从右向左)或 ltr (从左向右),默认值依赖于 language 的值。 |
| gitbook | 应该使用的GitBook版本。使用 SemVer 规范,并接受类似于 “> = 3.0.0” 的条件。 |
| links | 在左侧导航栏添加链接信息 |
| plugins | 要加载的插件列表 |
| pluginsConfig | 插件的配置 |
Gitbook 默认带有 5 个插件:
- highlight:语法高亮插件
- search:搜索插件
- sharing:分享插件
- font-settings:字体设置插件
- livereload:热加载插件
Note:去除插件"plugins": [ "-search" ]
插件配置示例
{
    "author": "Curiouser <******@163.com>",
    "title": "Devops Roadmap",
    "plugins": [
        "-search",
        "-lunr",
        "-sharing",
        "-highlight",
        "search-pro",
        "splitter",
        "github",
        "popup",
        "sectionx",
        "expandable-chapters",
        "sharing-plus",
        "code",
        "auto-scroll-table",
        "theme-fexa",
        "tbfed-pagefooter",
        "back-to-top-button",
        "emphasize",
        "edit-link",
        "prism",
        "donate",
        "theme-comscore",
        "github-buttons",
        "github-issue-feedback"
    ],
    "pluginsConfig": {
        "theme-default": {
            "showLevel": true
        },
        "github-issue-feedback": {
          "repo": "RationalMonster/rationalmonster.github.io"
        },
        "github": {
            "url": "https://github.com/RationalMonster"
        },
        "github-buttons": {
              "buttons": [{
                "user": "RationalMonster",
                "repo": "rationalmonster.github.io",
                "type": "star",
                "size": "small",
                "count": "true"
                  }]
        },
        "sharing": {
            "weibo": true,
            "qq": "true",
            "google": true,
            "all": [
                   "facebook", "twitter"
               ]
        },
        "code": {
            "copybuttons": "true"
        },
        "theme-fexa":{
            "search-placeholder":"搜索文章",
            "logo": "assets/logo.png"
        },
        "tbfed-pagefooter": {
            "copyright":"Copyright Curiouser",
            "modify_label": "该文件最后修改时间:",
            "modify_format": "YYYY-MM-DD HH:mm:ss"
        },
        "edit-link": {
          "base": "https://github.com/RationalMonster/rationalmonster.github.io/blob/master",
          "label": "ORIGIN In Github"
        },
        "prism": {
            "css": [
                "prismjs/themes/prism-tomorrow.css"
            ],
            "lang": {
                "flow": "typescript"
            },
            "ignore": [
                "mermaid",
                "eval-js"
            ]
        },
         "donate": {
            "wechat": "../assets/wechat-donate.jpg",
            "title": "",
            "button": "赏",
            "wechatText": "微信打赏"
        }
    }
}
八、GLOSSARY.md 编写规则
- GLOSSARY.md 的格式是 h2 标题的列表,以及描述段落
九、忽略文件和文件夹
GitBook将读取 .gitignore,.bookignore 和 .ignore 文件,来过滤不需要进行git版本控制的文件和文件夹。这些文件中的格式遵循 .gitignore 的规则:
# This is a comment
# Ignore the file test.md
test.md
# Ignore everything in the directory "bin"
bin/*

### gitbook ###
_node
!docs
_book
node_modules

### IDEA ###
.idea/

### VS Code ###
.vscode/

### OS ###
.DS_Store
十、封面
封面用于所有电子书格式。您可以自己提供一个,也可以使用 autocover plugin 生成一个。
要提供封面,请将 cover.jpg 文件放在书本的根目录下。添加一个 cover_small.jpg 将指定一个较小版本的封面。封面应为 JPEG 文件。
好的封面应该遵守以下准则:
cover.jpg的尺寸为 1800x2360 像素,cover_small.jpg为 200x262- 没有边界
- 清晰可见的书名
- 任何重要的文字应该在小版本中可见
十一、多语言支持
gitbook 支持构建用多种语言书写的书籍。每种语言应该是一个子目录,遵循正常的gitbook格式,然后需要在根目录下放置一个名为 LANGS.md 的文件,存放下列内容:
# Languages

* [English](en/)
* [French](fr/)
* [Español](es/)
注意:
- 当一个语言的书(如:en)有 book.json 时,它的配置将扩展主要配置。
- 唯一的一个例外是插件,插件是全局设置的,并且不能指定语言特定的插件
- 插件的配置必须写在根目录下的 book.json 文件中。然后其他语言的配置可以分别写在各自语言目录下的 book.json 文件中。
- LANGS.md 文件中各个语言出现的顺序,就是书籍首页出现的顺利。因此,写在第一位的语言,就自然成为书籍首页打开时的默认语言。
当一个语言的书(如:en)有 book.json 时,它的配置将扩展主要配置。
唯一的一个例外是插件,插件是全局设置的,并且不能指定语言特定的插件。
十二、托管到 GitHub Pages
知道如何编写gitbook了,那怎么放到网上让更多人看到呢。如果自己在各大云厂商那儿买个云主机自己搭建一个运行环境,一年又得多处几百大洋的开销。本着能“白嫖”就不掏腰包的精神,尝试使用其他途径免费部署自己的Gitbook。
Github 有个功能 GitHub Pages 。它允许用户在 GitHub 仓库托管你的个人、组织或项目的静态页面(自动识别 html、css、javascript)。只要仓库指定分支中的内容符合一个静态站点要求,就可以在如下地址中进行访问:https://Github用户名.github.com/仓库名
在Github中设置GitHub Page Source时可指定分支。
- gh-pages branch
- master branch
- master branch /docs folder
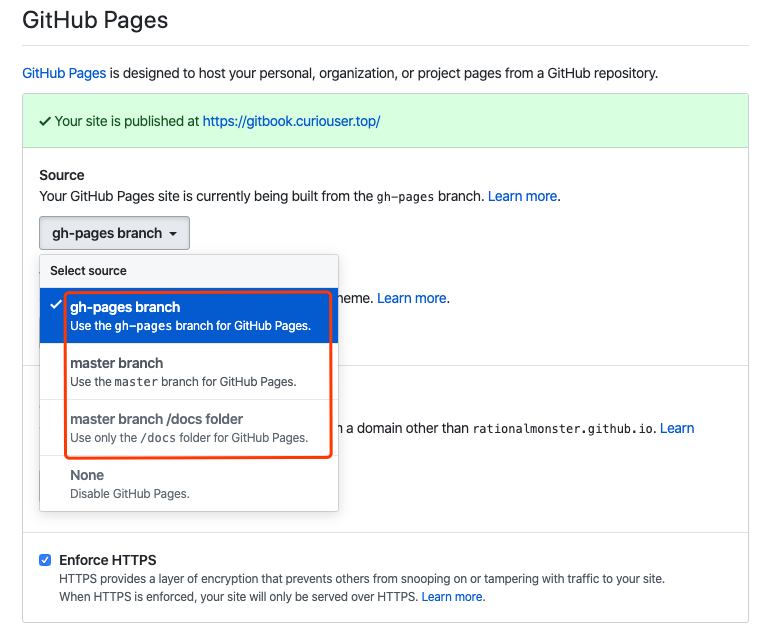
不同的方式,无非是决定gitbook构建后的静态页面HTML文件存放在哪儿的问题。
- 方式一(推荐):在master分支中存放gitbook原始Markdown文件、配置文件等,在gh-pages分支中存放gitbook构建后的静态页面HTML文件。
- 方式二:在master分支中即存放gitbook原始Markdown文件,也存放gitbook构建后的静态页面HTML文件。只不过是在/docs文件下
1、在GitHub中建立仓库并将本地代码推送至master分支
GitHub只建立空仓库是无法创建分支的。所以需要将本地代码推送到远程仓库master才可以
git init
git remote add origin git@github.com:**/gitbbook-devops-roadmap.git
git add .
git commit -m "init commit"
git push origin master
2、(方式二)在本地建立空白gh-pages分支并同步到GitHub
仓库中建立一个名为 gh-pages 的分支。
git checkout --orphan gh-pages
# 该命令会创建gh-pages分支,并且该分支下有master分支下的所有文件
git rm -rf *
# 删除master分支带过来的文件(“git rm -rf *"命令并不能删除隐藏文件,可使用““git rm -rf ."命令)
rm '.gitignore'
# 如果master中.gitignore文件,可删除


# 如果没有任何文件提交的话,分支是看不到的,可以创建一个新文件后再次提交则新创建的gh-pages分支就会显示出来。
echo "# MacOS\n*.DS_Store" > .gitignore
git add .
git commit -m "init commit"
git push origin gh-pages
当本地gh-pages分支同步到远程GitHub仓库分支后,在GitHub分支进行验证
3、在本地构建静态页面HTML文件
在Master分支下使用“gitbook build”命令生产静态页面HTML文件
gitbook install
# 该命令后会下载构建gitbook所需的插件及资源到当前目录“node_modules”下
gitbook build . [静态页面HTML文件输出文件夹]
# 该命令默认会将静态页面HTML文件输出到当前目录"_book"下。如果指定,则输出到指定目录。
4、(方式二)使用gh-pages插件将本地静态页面HTML文件推送到远处仓库gh-pages分支
本地安装gh-pages插件
npm install gh-pages -g
gh-pages命令详解
Usage: gh-pages [options]

Options:
  -V, --version            output the version number
  -d, --dist <dist>        Base directory for all source files
  -s, --src <src>          Pattern used to select which files to publish (default: "**/*")
  -b, --branch <branch>    Name of the branch you are pushing to (default: "gh-pages")
  -e, --dest <dest>        Target directory within the destination branch (relative to the root) (default: ".")
  -a, --add                Only add, and never remove existing files
  -x, --silent             Do not output the repository url
  -m, --message <message>  commit message (default: "Updates")
  -g, --tag <tag>          add tag to commit
  --git <git>              Path to git executable (default: "git")
  -t, --dotfiles           Include dotfiles
  -r, --repo <repo>        URL of the repository you are pushing to
  -p, --depth <depth>      depth for clone (default: 1)
  -o, --remote <name>      The name of the remote (default: "origin")
  -u, --user <address>     The name and email of the user (defaults to the git config).  Format is "Your Name <email@example.com>".
  -v, --remove <pattern>   Remove files that match the given pattern (ignored if used together with --add). (default: ".")
  -n, --no-push            Commit only (with no push)
  -f, --no-history         Push force new commit without parent history
  -h, --help               output usage information
推送静态页面HTML文件
gh-pages -d _book
5、GitHub配置gh-pages服务
6、(可选)自定义域名访问GitHub Pages托管的Gitbook
此时你可以通过https:/Github用户名.github.io/仓库名访问你的Gitbook啦。但是如果你在阿里云上购买的有自己的域名,可直接将域名指定到gitbook page域名,使用自己的域名访问。
在GitHub中设置仓库的CNAME
直接在GitHub中进行设置
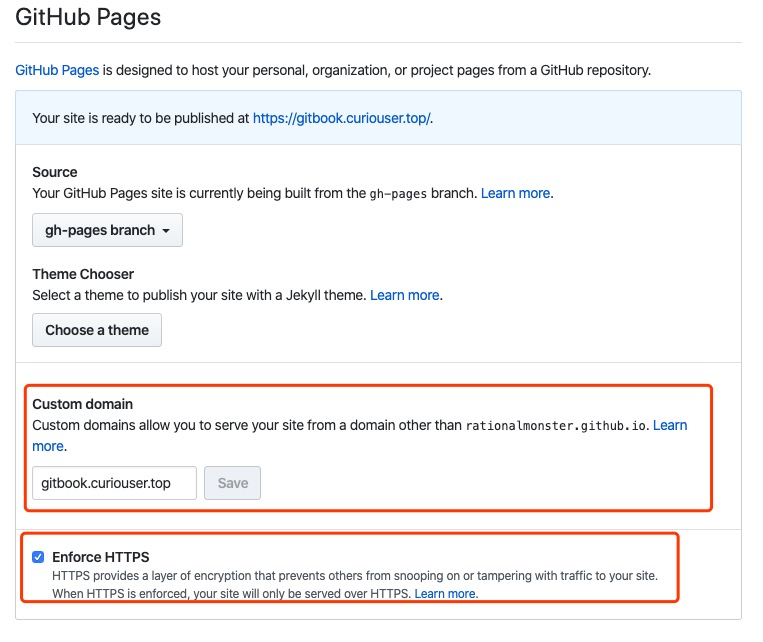
(推荐)在master分支代码根路径下创建CNAME文件,文件中写入你自定义的域名(每个CNAME文件能且只能指定一个域名)。例如:
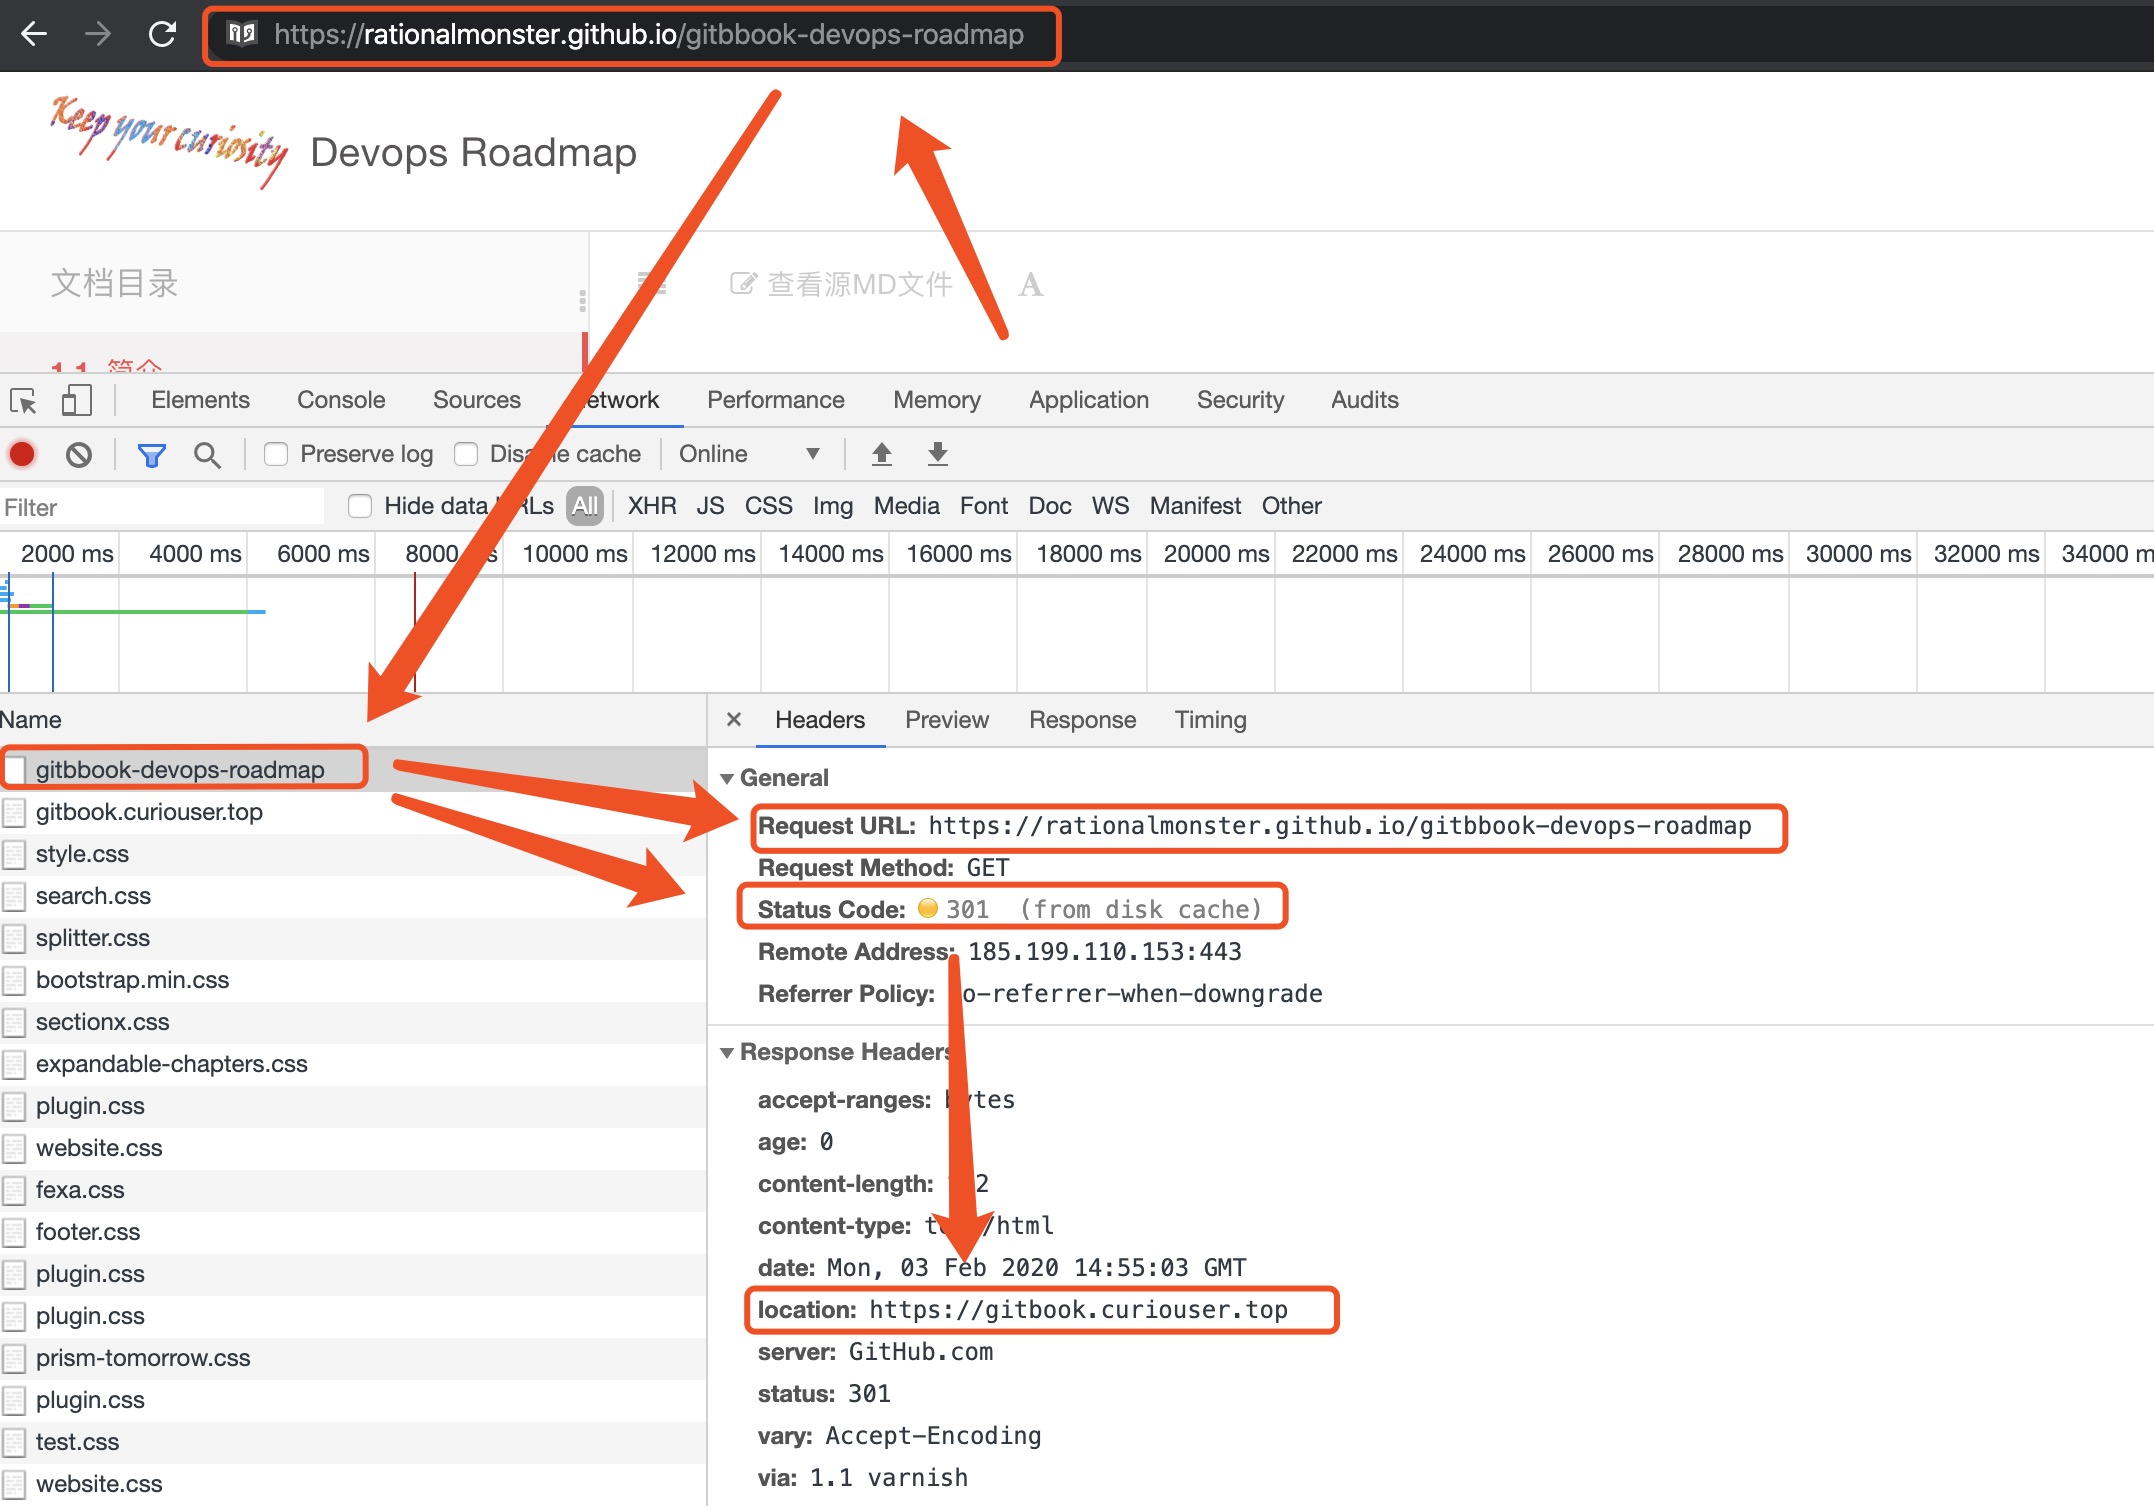
gitbook.curiouser.top。Github读取你的CNAME文件之后,Github服务器会设置
gitbook.curiouser.top为你的主域名,然后将rationalmonster.github.ioo重定向到gitbook.curiouser.top
在阿里云上添加域名解析记录
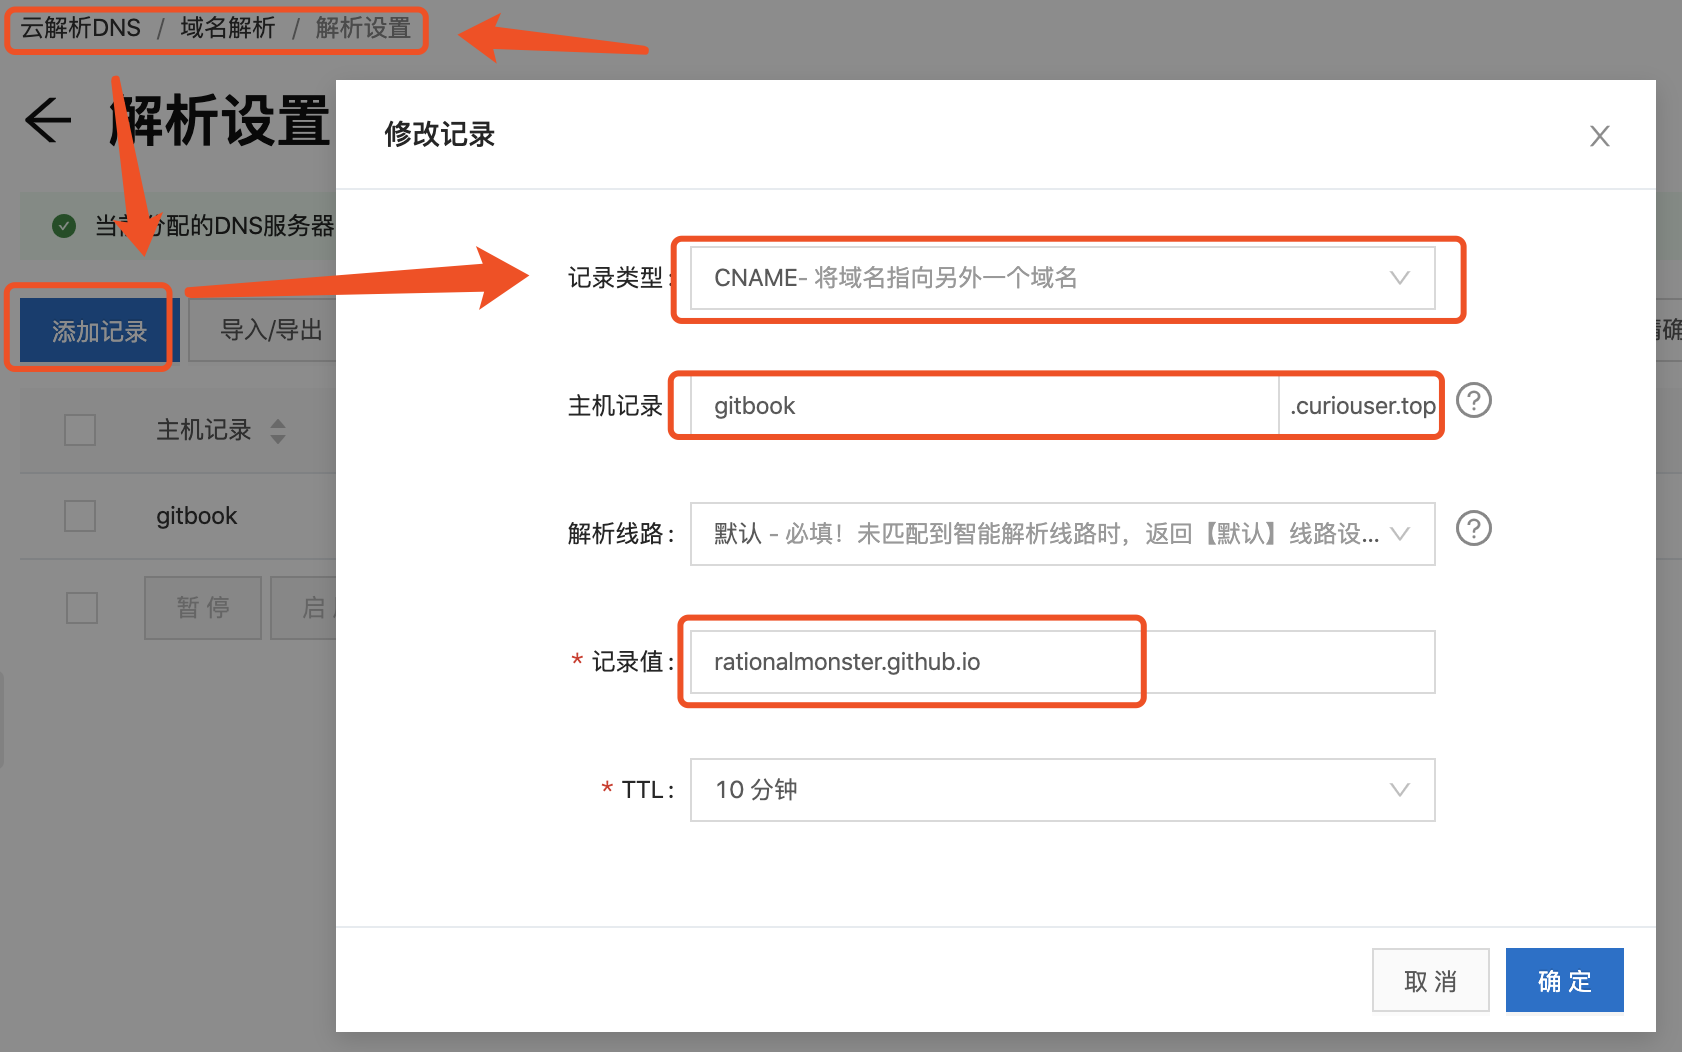
等待3~10分钟,通过自定义域名访问自己的gitbook。
问题
gitbook serve时,偶尔不规律性地出现编译错误,而且每次出现的错误文件还可能不一样,实在是头疼得很,每次修改要编译多次才能成功
修改
C:\Users\当前用户名\.gitbook\versions\当前使用的gitbook版本\lib\output\website\copyPluginAssets.js文件中的112行,将confirm: true改为confirm: false